Measurement of a custom-shaped pond
Why choose a custom-shaped pond liner? #
Custom-shaped pond liner
✓ The lengths of the liner strips can vary
✓ The liner strips can be shifted relative to each other
✓ Reduces costs
✓ Environmentally friendly
Rectangular-shaped pond
✗ Liner strips of equal length
✗ Strips start and end at the same points
✗ Material cannot be optimized
✓ No need for detailed surveying
Custom Pond Liner Design #
To ensure accurate results, you will need the following tools: #
Long measuring tape
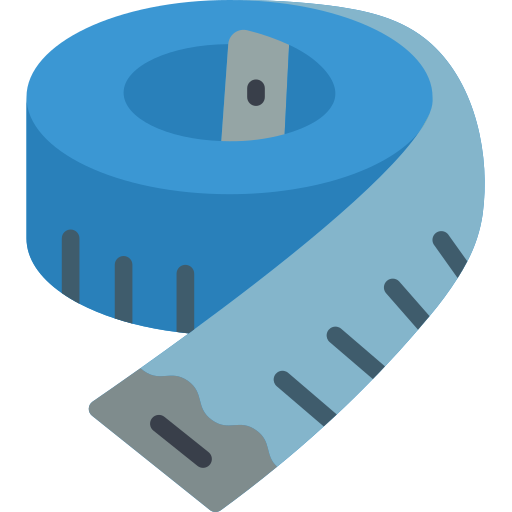
Use a 30, 50 or 100-meter measuring tape, depending on the size of the pond
Clipboard, Paper, Pen

This will be used to draw the shape of the pond and record your measurements
Spray paint
or a stick

You can mark reference points on the ground with them
At least 2 people

Make sure to have at least one assistant with you during the survey
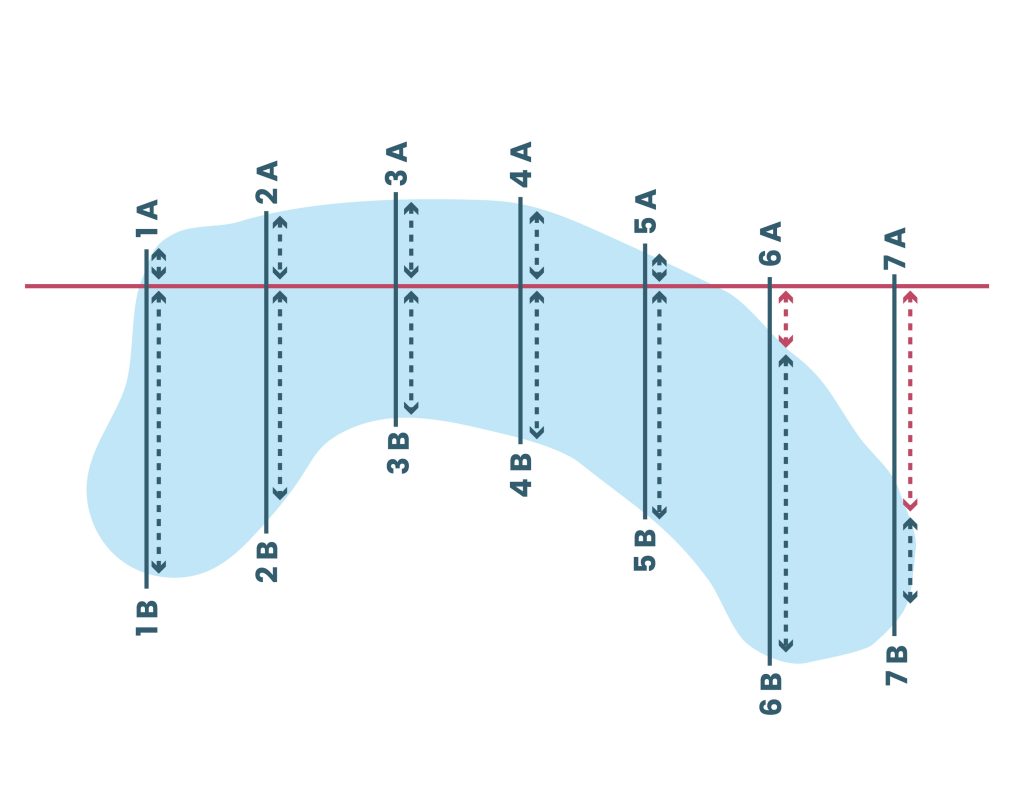
Overview of the Survey Process #

1. First, mark the spine line along the bottom of the pond
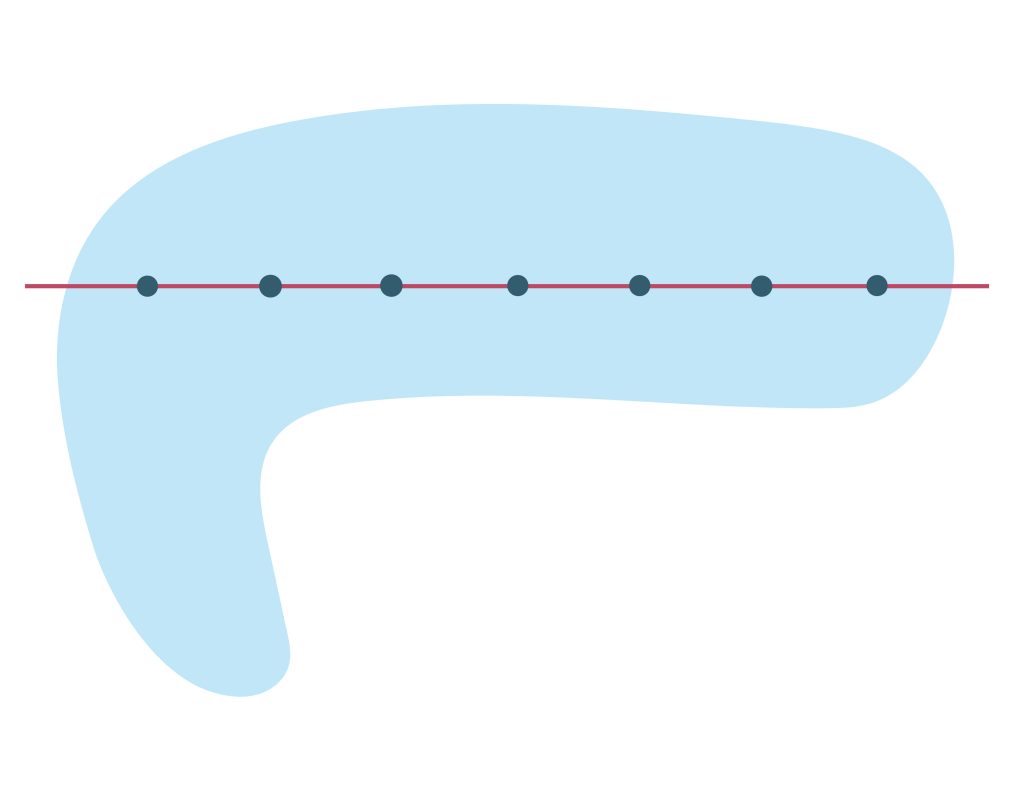
2. Then, mark the positions of the ribs along the spine
3. Finally, measure the length of each rib on both sides of the spine
Marking the Spine Line #
This is the first task of the survey.
The process is a bit like drawing a skeleton: first, you mark a spine line, and then you draw the ribs onto it.

There are two ways to define the spine line:
Option A

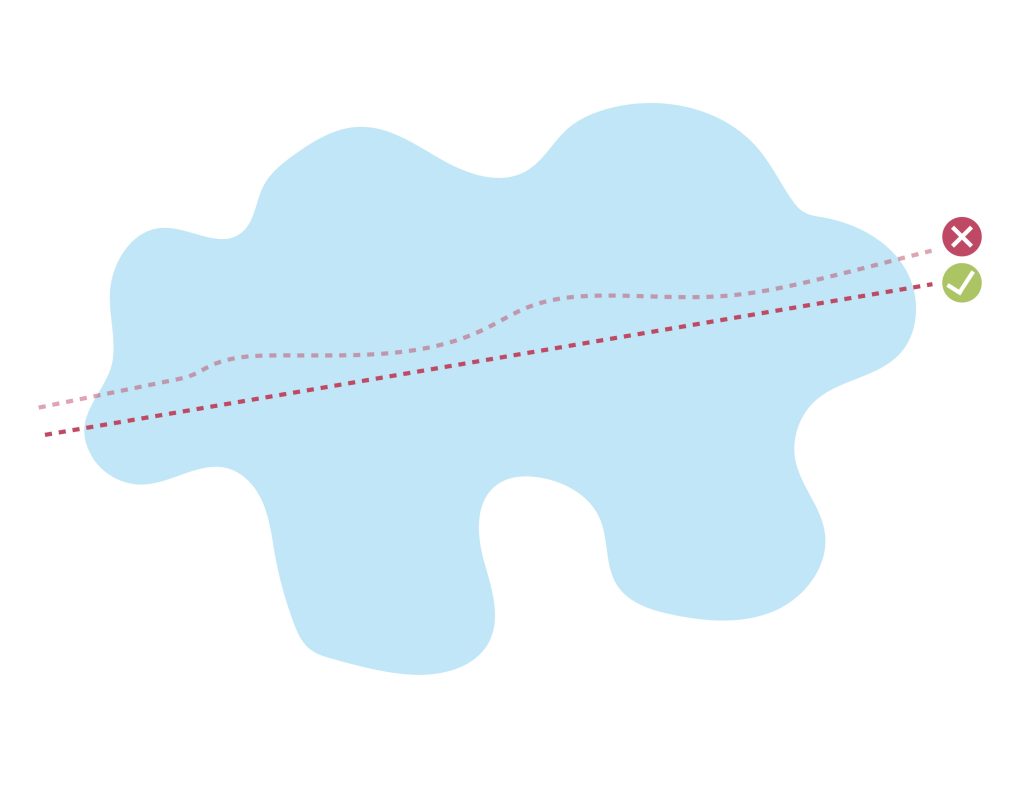
You can lay the measuring tape parallel to the longest and straightest side of the pond.
The advantage of this method is that it minimizes liner waste due to the shape of the pond, and it makes it easier to measure the rib lengths in the next step. Additionally, during installation, it is much easier to find the correct position for the liner when unfolding it.
The disadvantage is that if the spine line parallel to the straightest side does not touch all points of the basin (i.e., does not cover the longest possible path), then it may be difficult to apply.
Choose this option wherever possible.
Option B
You can lay the measuring tape by connecting the two most distant points of the pond.
The advantage of this method (which solves the disadvantage of the previous one) is that the spine can run through the entire basin, and rib measurements can be taken on both sides.
The disadvantage is that both edges of the liner will follow the shape of the basin in a stepped manner, which requires slightly more material. It is also a bit harder to find the correct position for the liner during installation, and the exact size is harder to estimate not only on one side, but on both sides of the spine. This is because in this case, the ribs will not be perpendicular to the outline of the basin anywhere, so it is recommended to plan with a small surplus for each measurement to ensure the liner is not smaller than needed (see later).
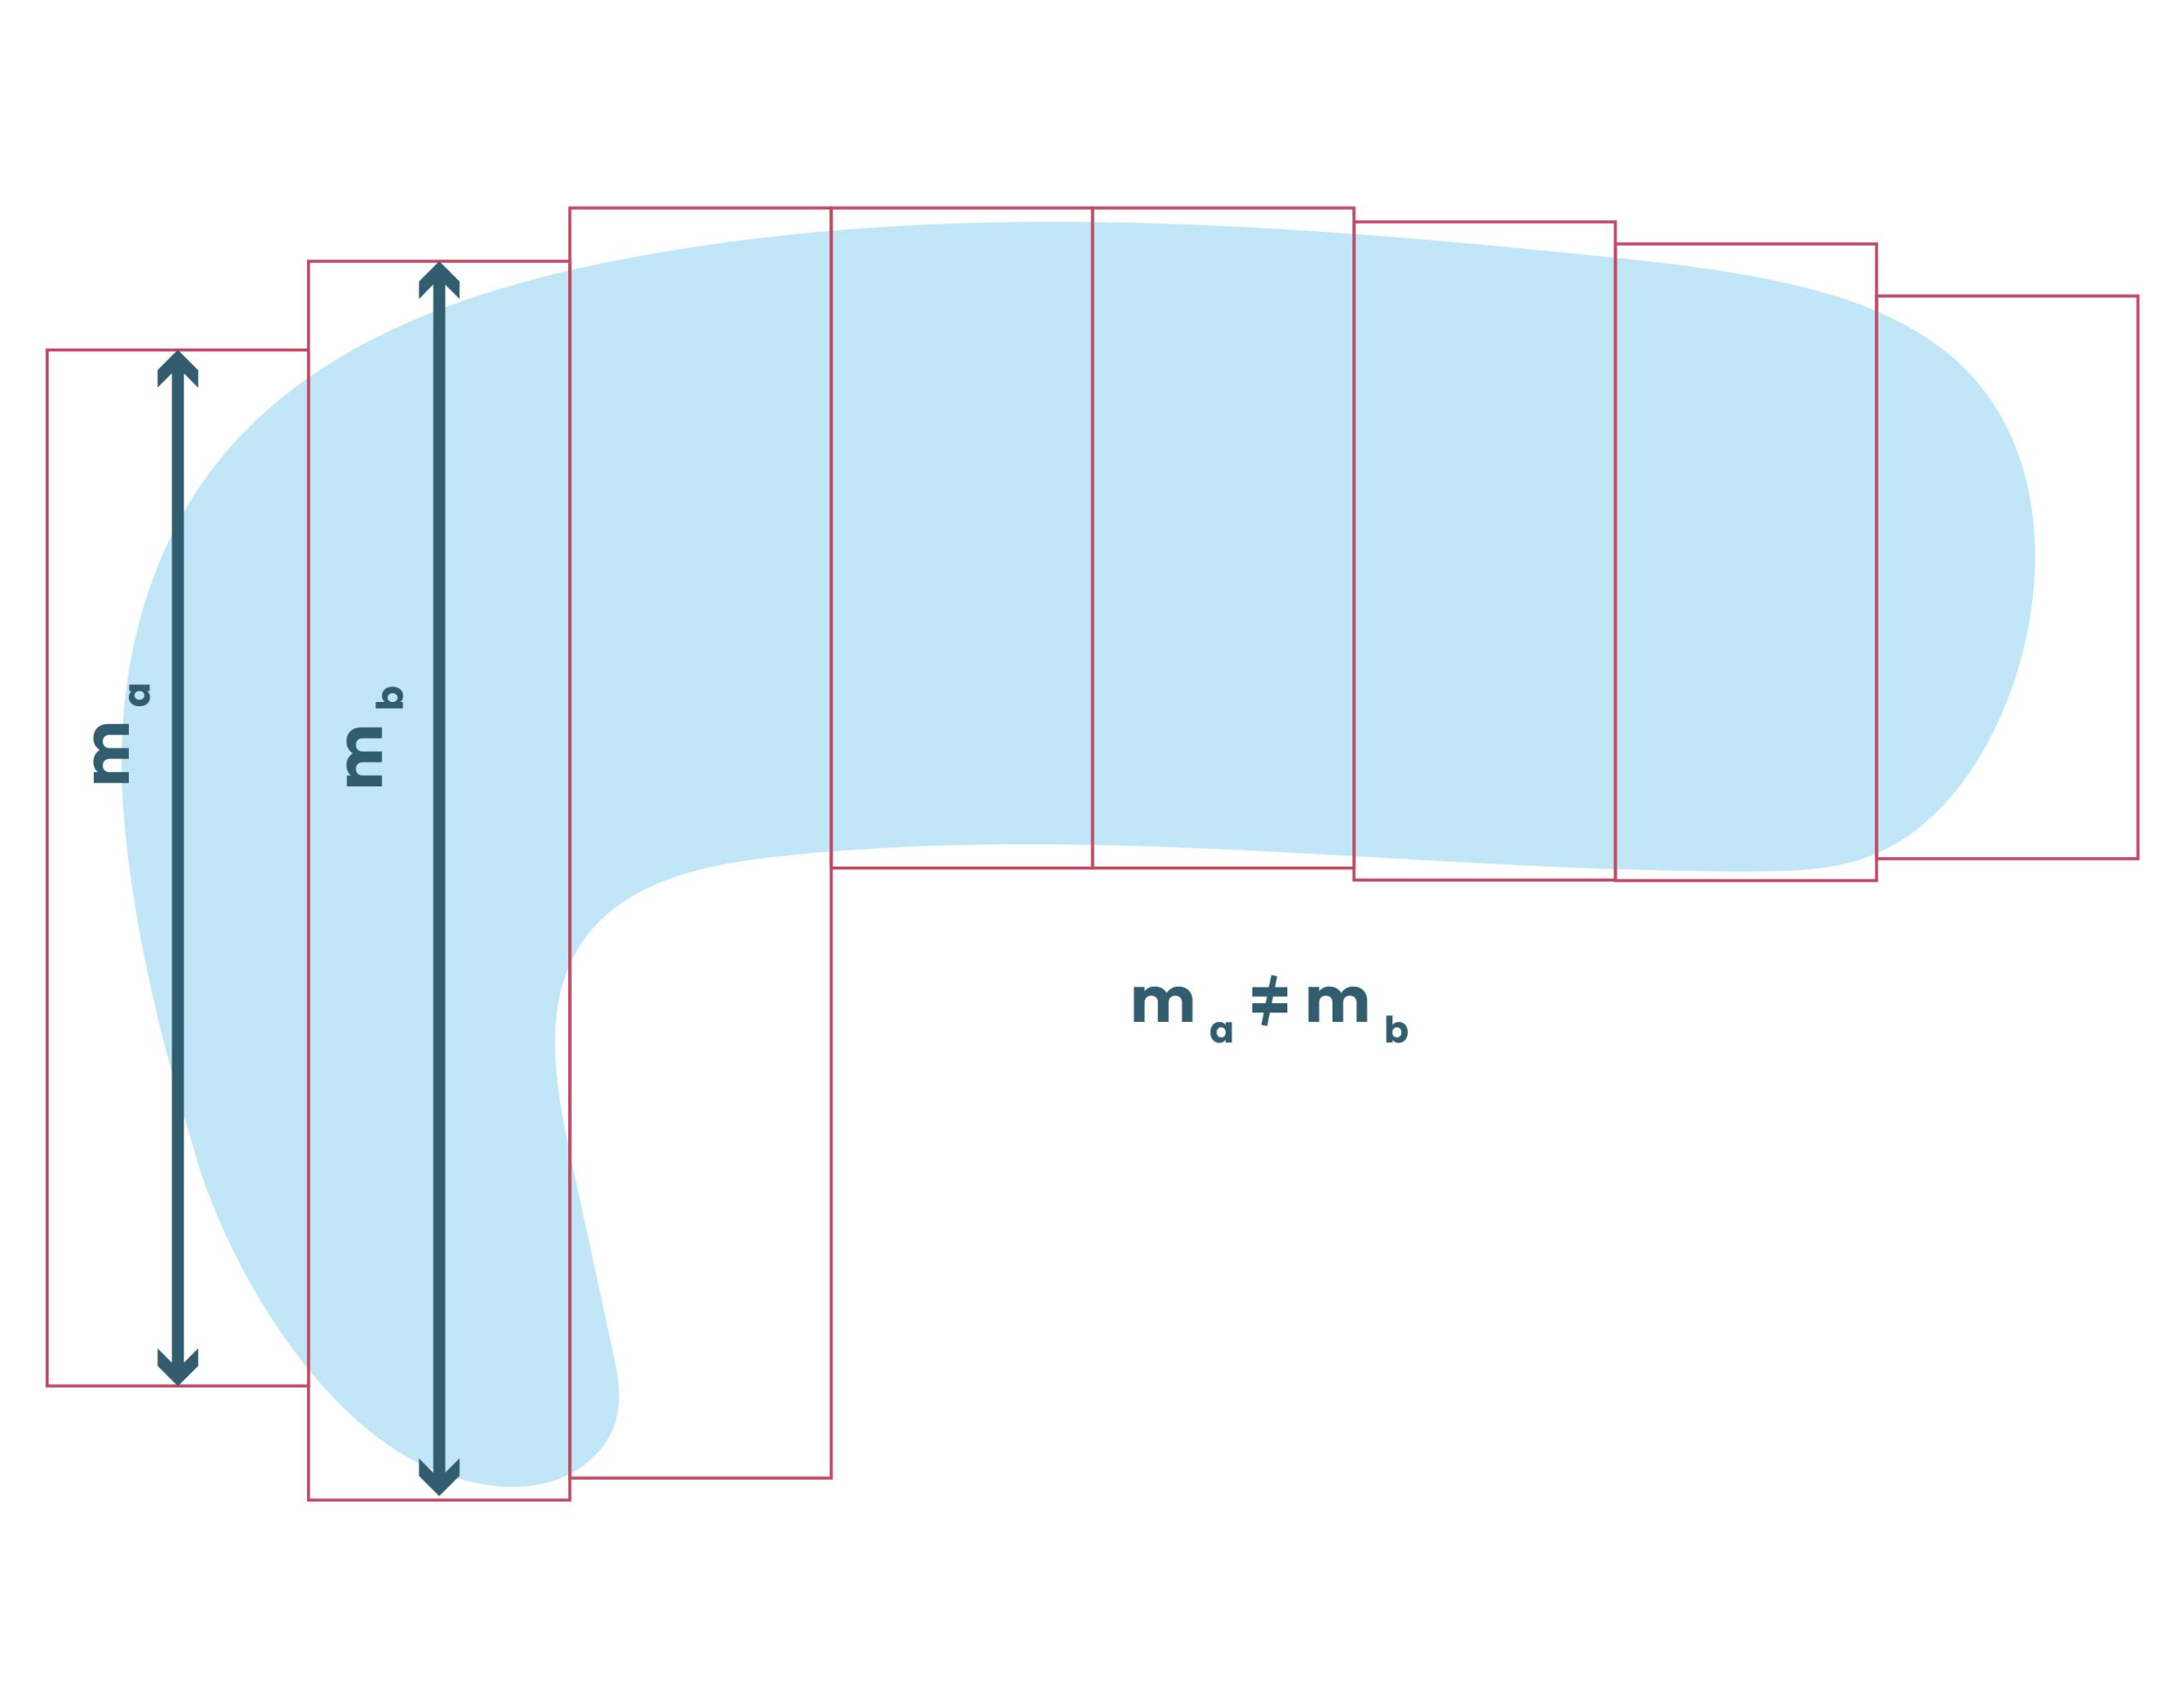
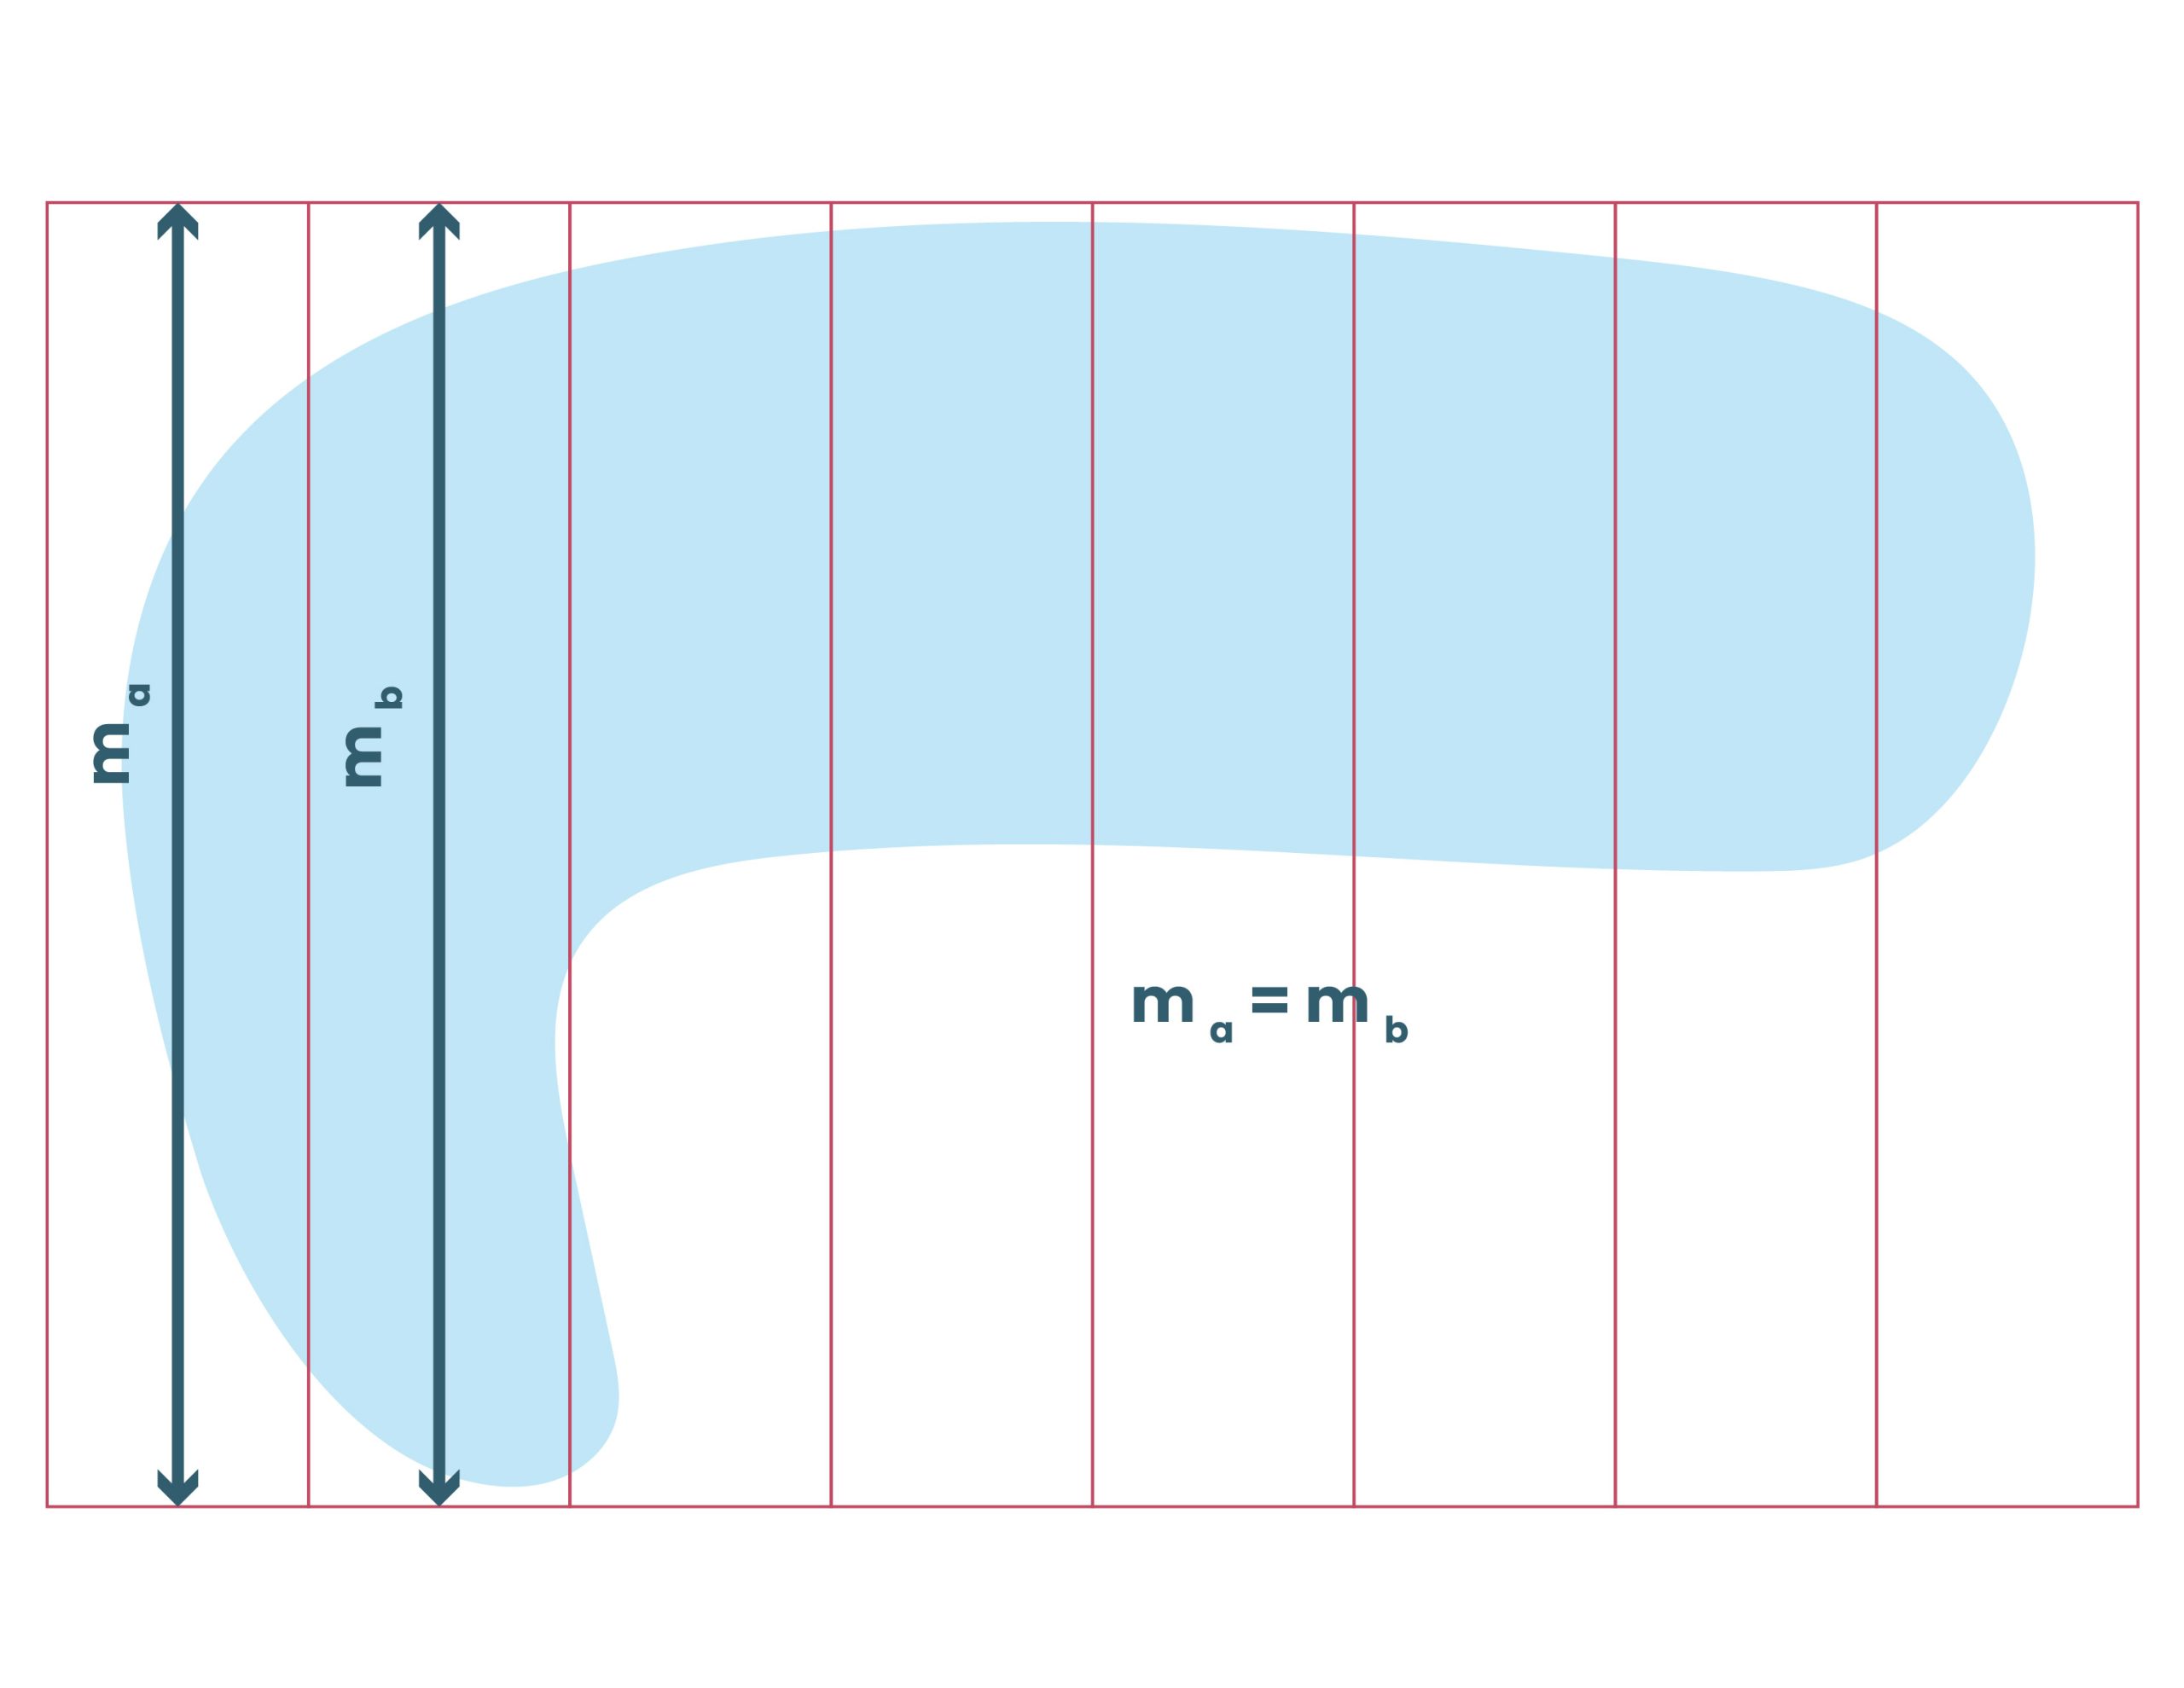
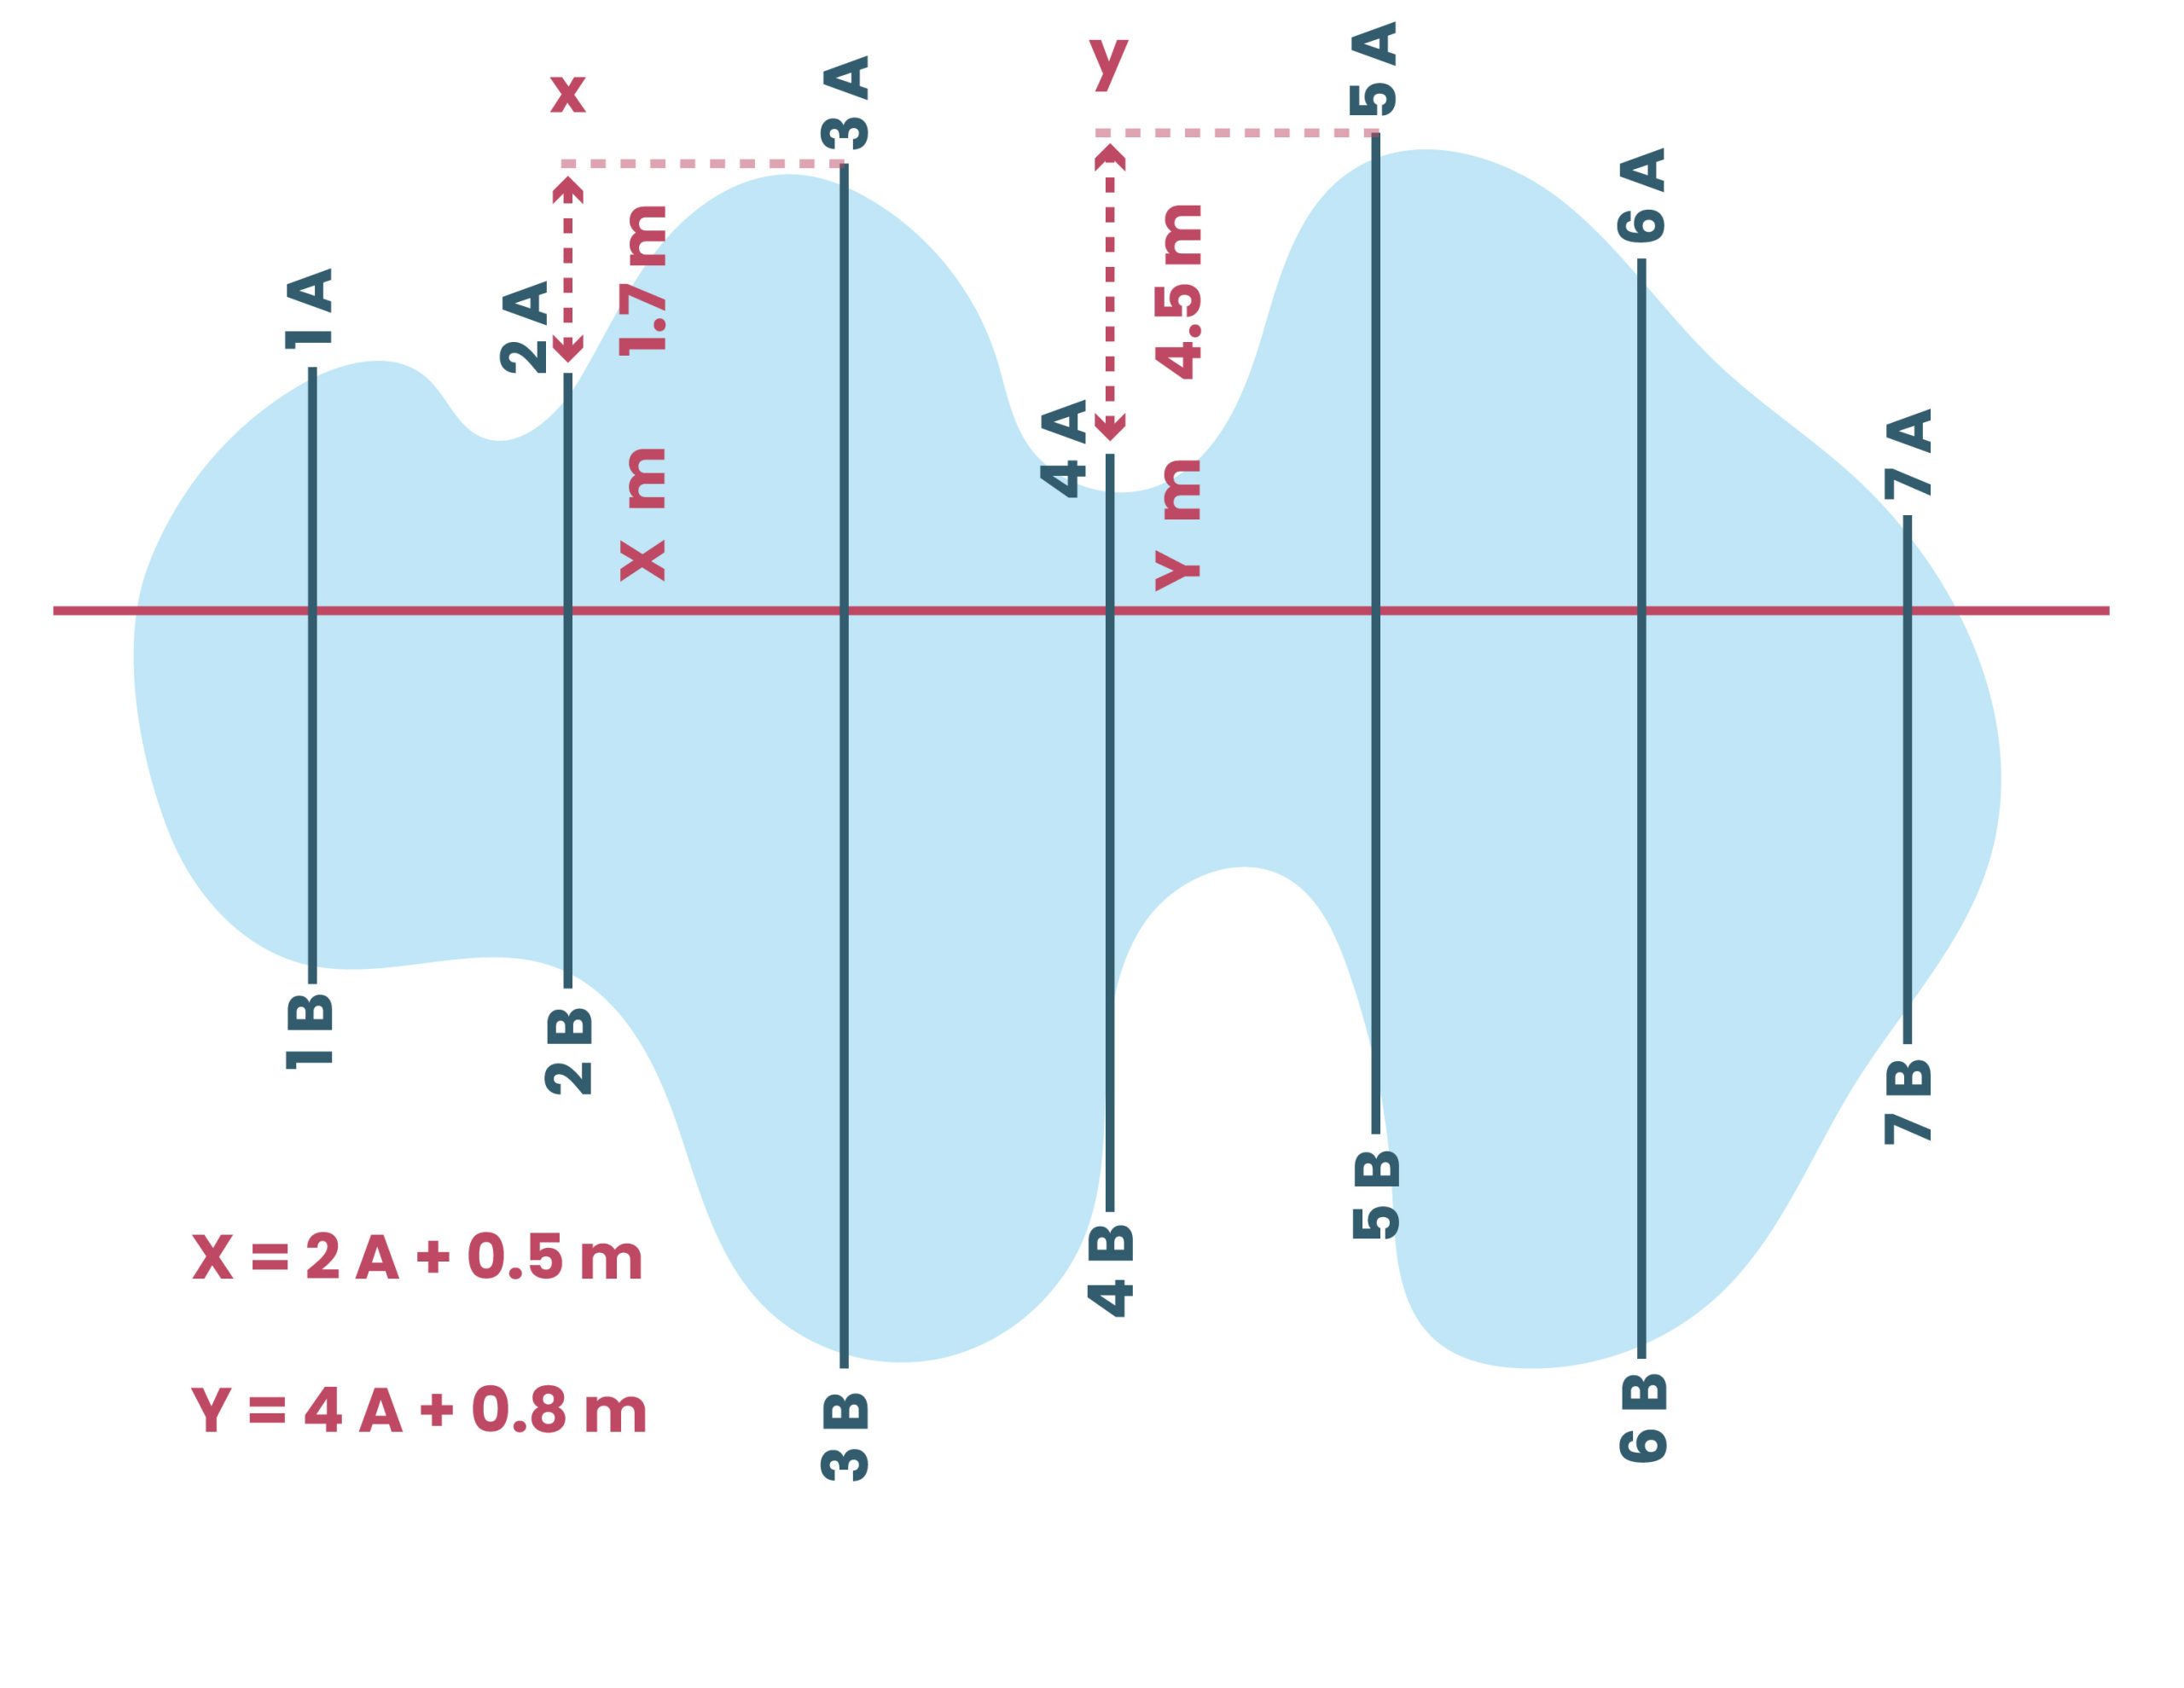
So the basic principle is: the spine is a straight line along which the measuring tape is laid out, covering the longest possible path within the basin.
This line typically runs through the deepest point and connects the most distant points of the pond.
It is worth checking this with measurements in several places, because this is not necessarily true for every pond shape.szerűen.
Important:
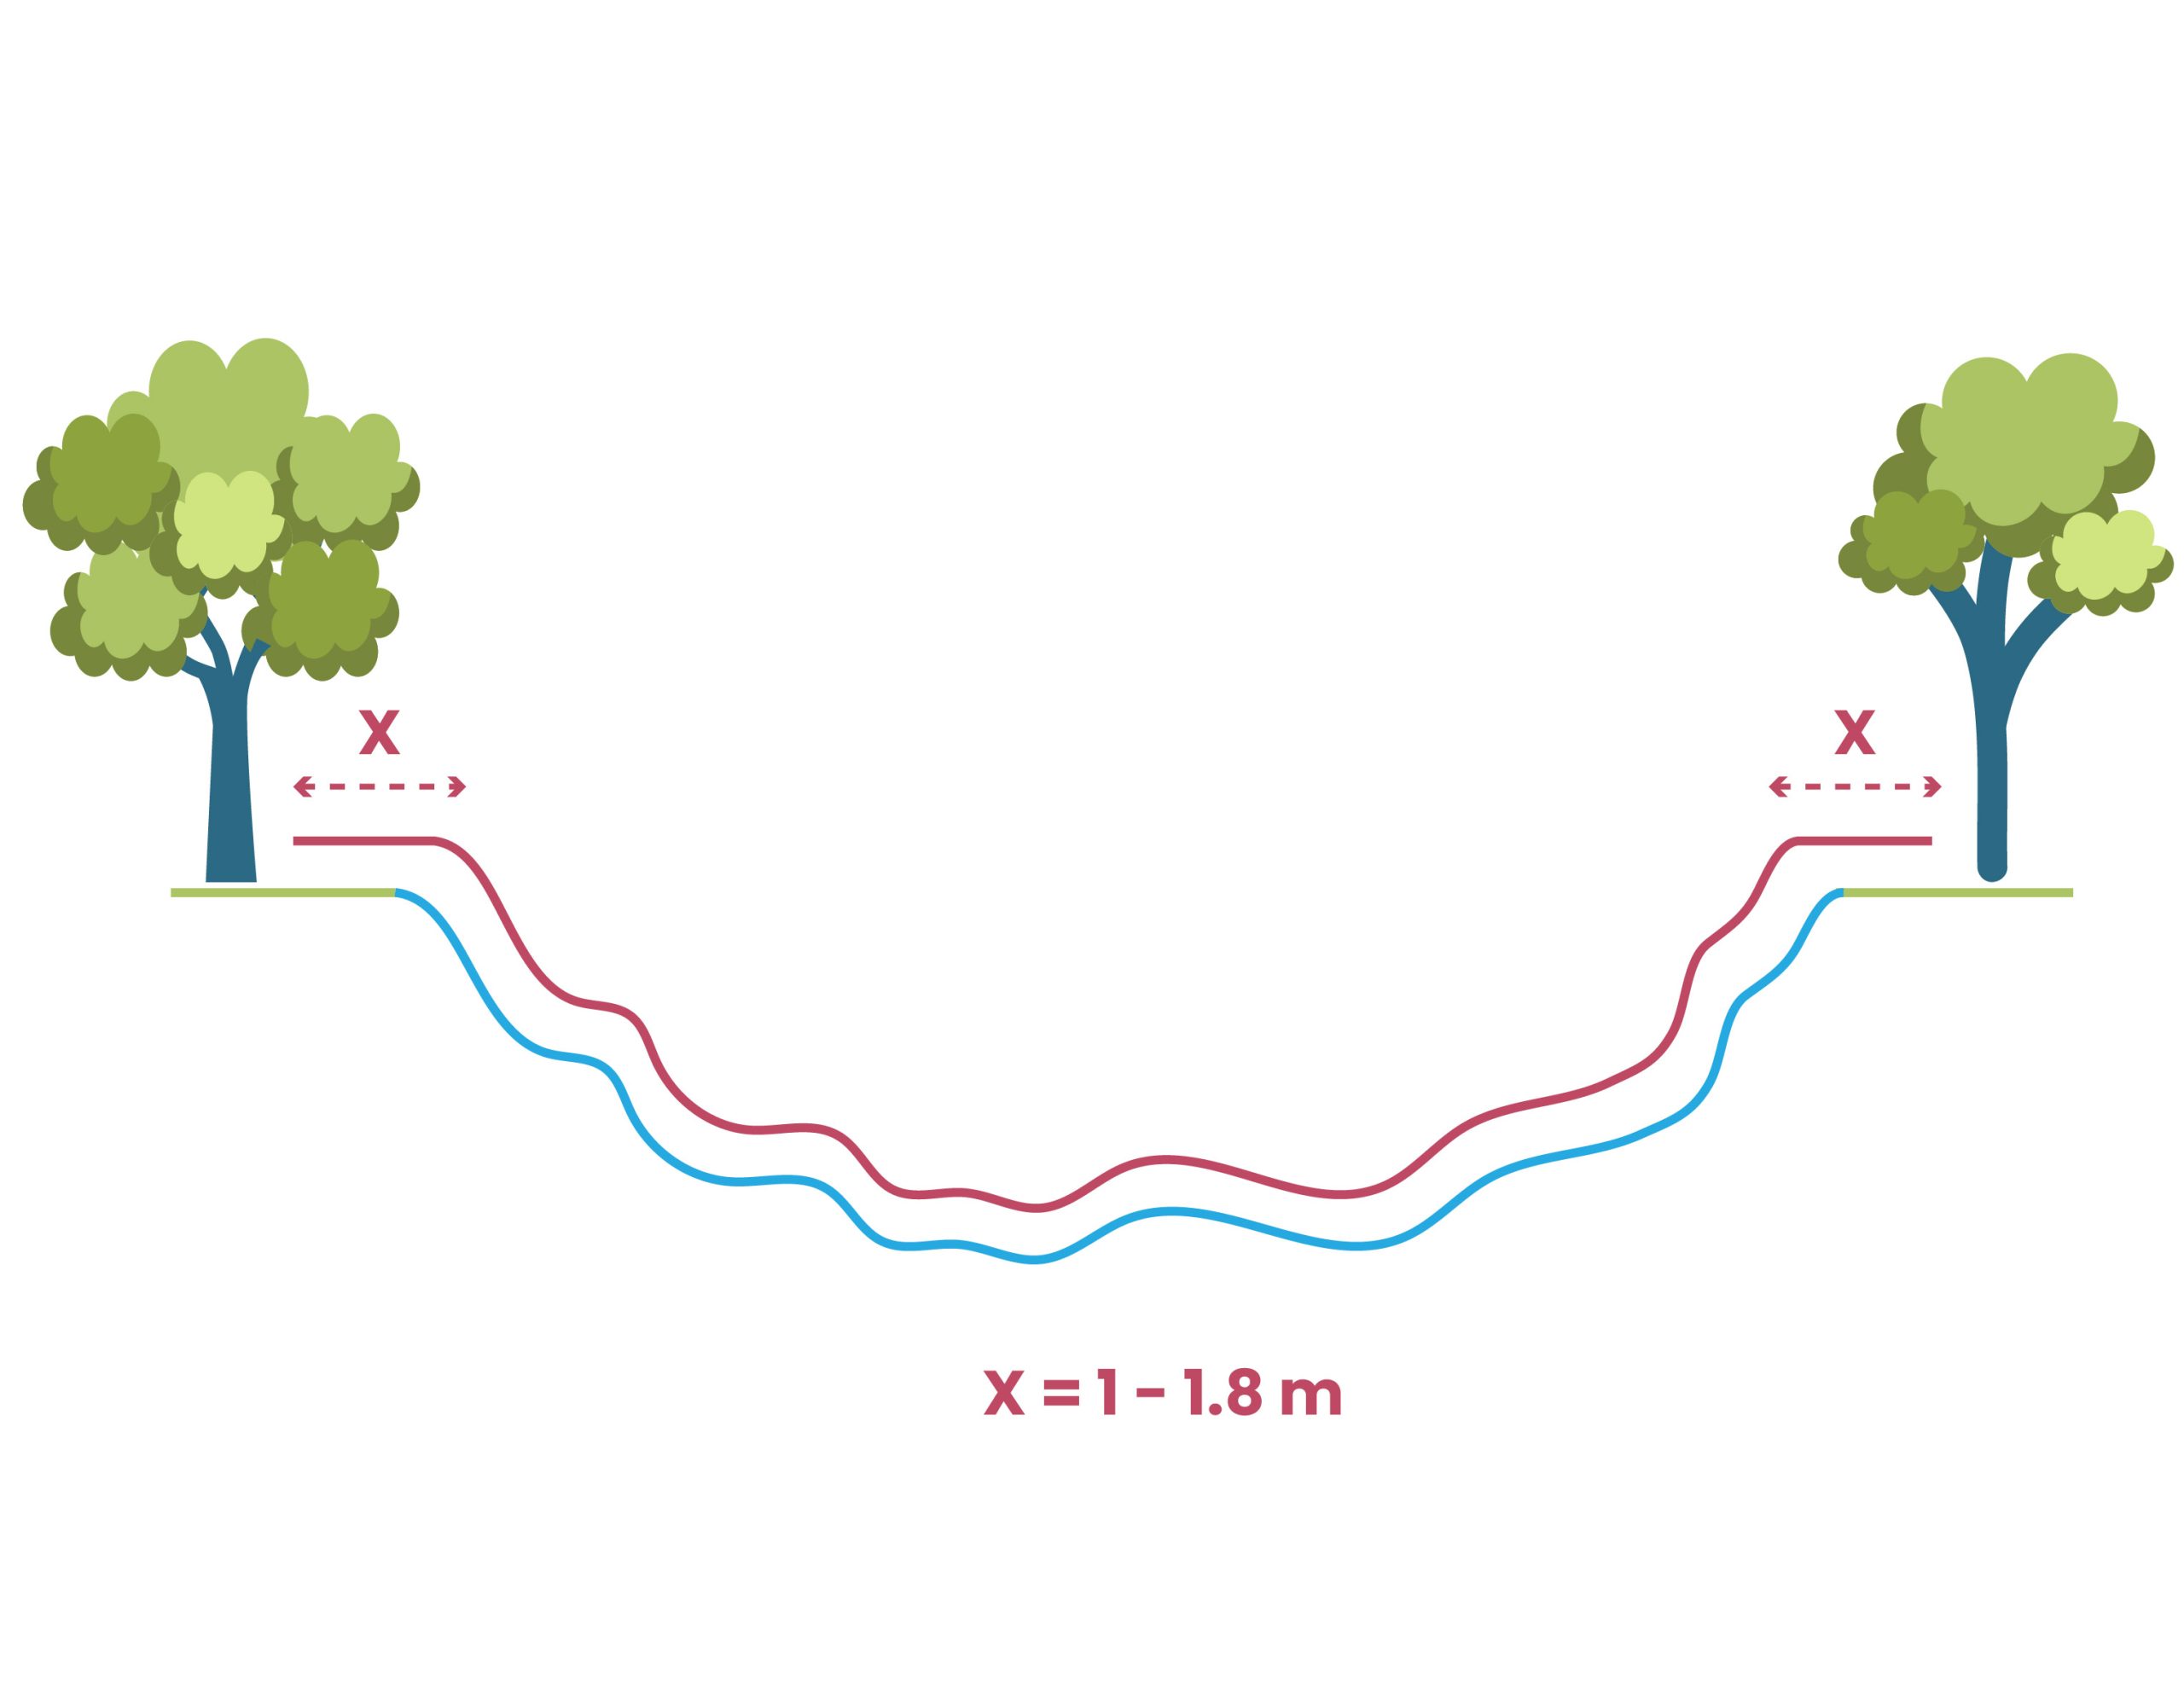
The spine line must follow the full topography of the basin, meaning the measuring tape should be laid along a line that passes through both the deepest and highest points of the pond.
The beginning and end of the measuring tape should extend beyond the pond basin, not just from one edge to the other. The amount of overhang will correspond to the extra material needed for securing the liner. So make sure both ends of the tape extend equally, based on the amount of securing allowance you plan for. You should allow at least 100 cm of extra length, but depending on the securing method and soil type, this can be up to 180 cm.
Tip
The spine line will be parallel to the selected side if you determine two points by measuring equal distances from the edge of that side toward the center of the basin.
Mark the spine line using the measuring tape by connecting these two points. In this case, the measuring tape should pass through both points.
The spine line is always straight, while the shape of the pond may not be. If there is a significant difference between the two, try marking the spine line along a different path.
Marking the rib positions #
The next task is to mark lines that are perpendicular to the spine line. These lines are the ribs.
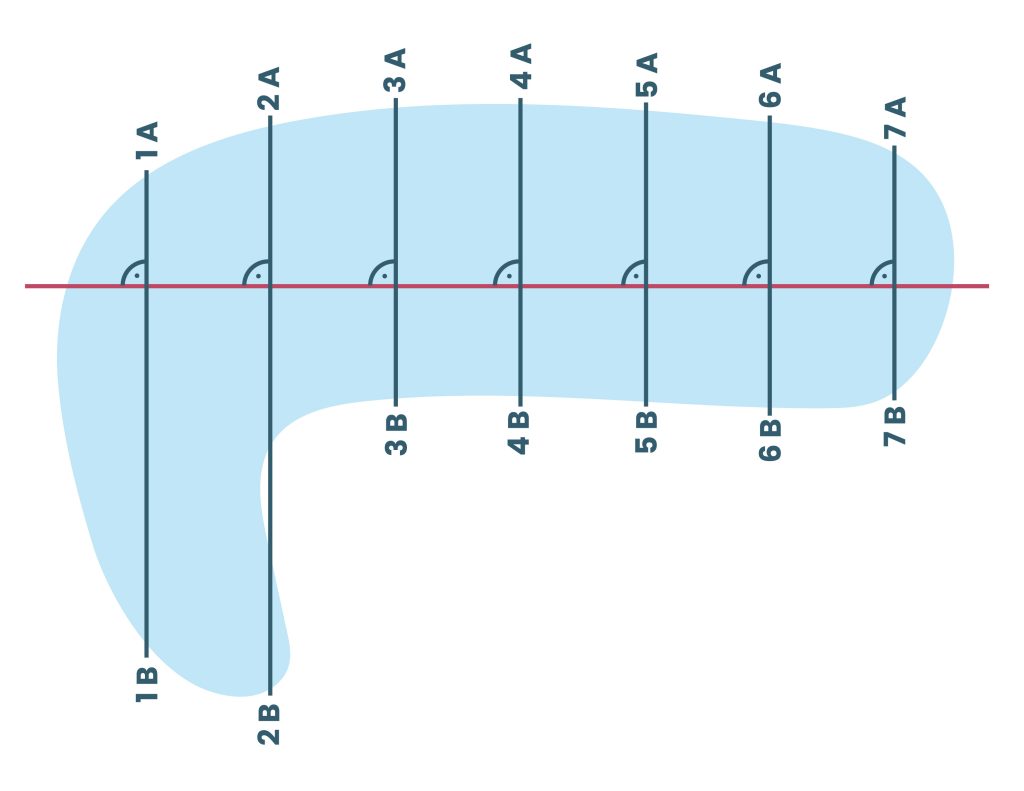
Let the beginning of the measuring tape (0 m), which represents the spine line, extend beyond the edge of the pond by the amount needed for securing. The very beginning of the tape (0 m) marks the planned edge of the liner, meaning that at the pond’s edge, the tape will show the securing allowance (about 100–180 cm).
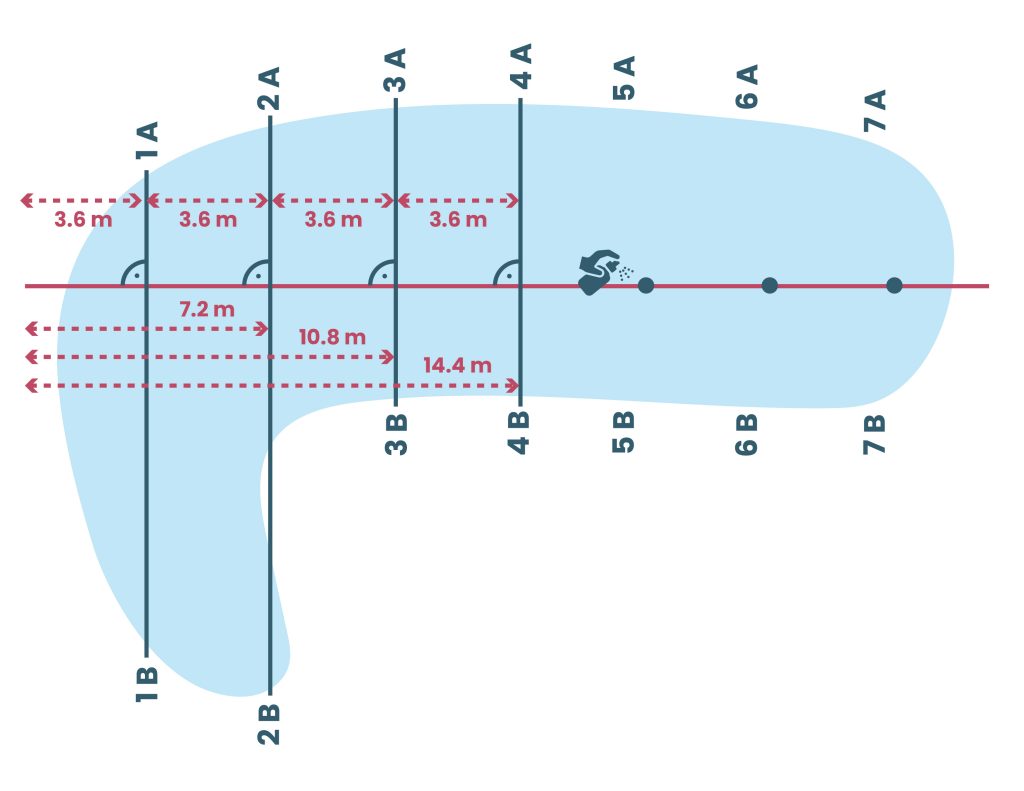
The ribs must be marked along this spine line. The first rib should be marked at 3.6 meters on the measuring tape.
So:
- The 0 m point (the very beginning of the tape) is placed outside the basin.
- At the edge of the pond, the value shown on the tape corresponds to the securing allowance (e.g. 1.3 m).
- The first rib is marked at 3.6 m, the second at 7.2 m, the third at 10.8 m, then 14.4 m, and so on, in increments of 3.6 m.
Important:
You do not need to mark the start and end points of the measuring tape, as they fall outside the basin.
Tip:
It will be helpful later if you paint markings that are at least 50 cm long, and it is important that these markings are perpendicular to the spine line.
The markings should be straight lines. After removing the measuring tape that represents the spine line, the gap between the markings on both sides will show where the spine line was previously located. If you have two measuring tapes, the process is easier, but the markings are still necessary. It may also happen that the spine line shifts for some reason — markings made in the way described above will help you continue the measurements even in such cases.
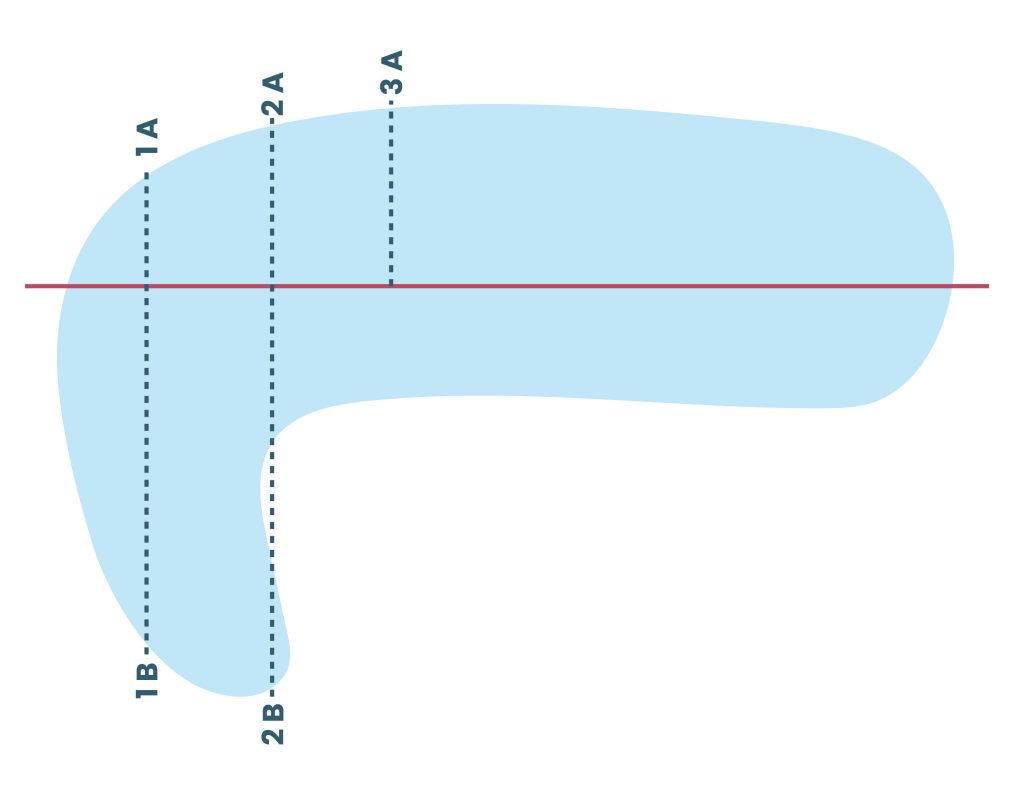
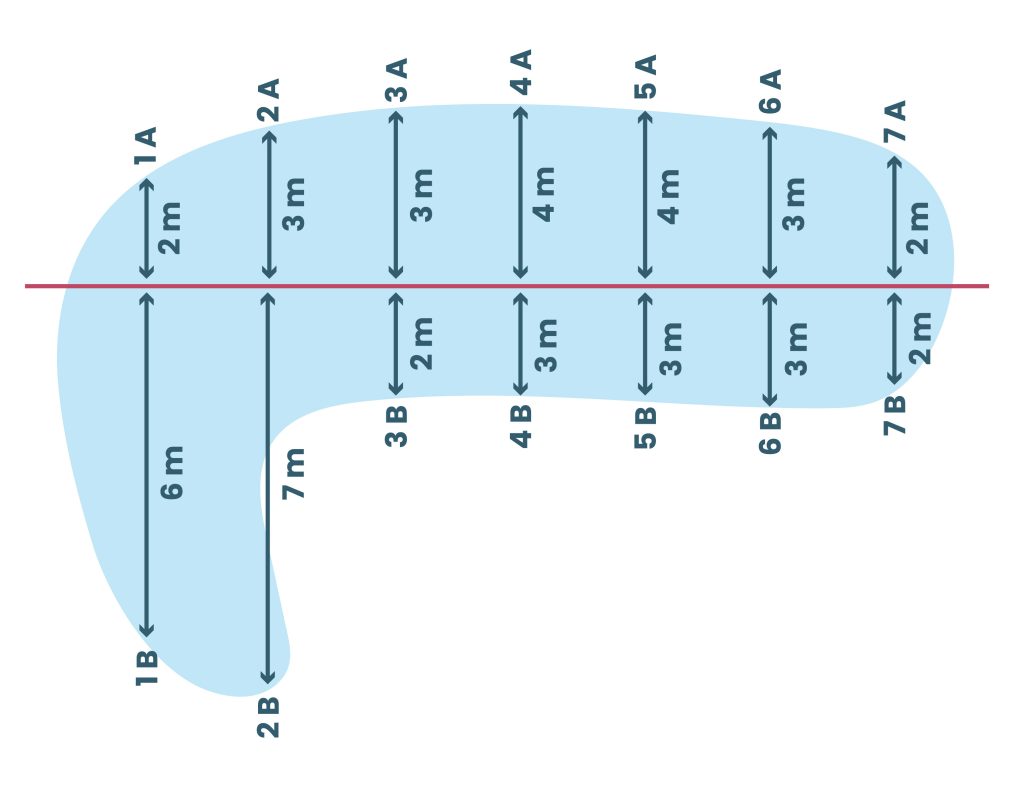
Measuring the rib lengths #
You need to measure the length of each rib at every point you previously marked (on both sides of the spine line — first on the right side, then on the left side). Do it as follows:
- Take out your paper and pen and make a sketch to make the process easier. Draw a straight line roughly in the middle of the page — this will be the spine line.
- Draw as many perpendicular lines (ribs) to the spine line as you previously marked. Start drawing each rib from the spine line and end at the edge of the pond basin. Measure the length of each rib and record your measurements on the sketch.

Important:
During rib measurements, the measuring tape must also follow the terrain of the pond basin. The tape should not be wrinkled, but you don’t need to stretch it perfectly tight either. The liner sheet will also be placed into the basin with small waves and folds.
You can measure up to the very edge of the basin without any extra allowance, but in that case, you must later add the securing allowance or other extras by calculation. If you already know exactly where the edge of the liner will be (for example, if the anchoring trench has already been dug), then include that in the rib length during measurement. If the anchoring trench is not yet in place, then let the tape extend beyond the edge by the expected securing allowance, and record the resulting value.
Tip:
If you write the measured rib lengths directly onto each rib on both sides (e.g. 1A = 3 m, 1B = 4 m), you won’t confuse which value belongs where.
If you only have one measuring tape, and you want to determine the ribs perpendicular to the spine line, you can replace the tape previously used for marking the spine with a longer string, rope, or even a garden hose. Then you can use the freed-up measuring tape to mark the perpendicular ribs. Of course, if you have two measuring tapes, the first one can remain fixed on the spine line.
When it’s worth planning with slightly longer liner dimensions #
Here are some tips to keep in mind to make sure the liner is never smaller than needed.
Sometimes it’s necessary to plan with slightly more than the measured lengths because the liner sheet is a flat, spread-out material. First, it has to line a three-dimensional shape with depth. Second, the liner is made from a single piece, so different parts of the basin interact with each other — a section that requires more material can reduce the available liner size from multiple directions.
Compared to the survey, the liner sheet will not settle into the pond basin in a perfectly predictable way, so it’s better to plan with safety margins to avoid unpleasant surprises.
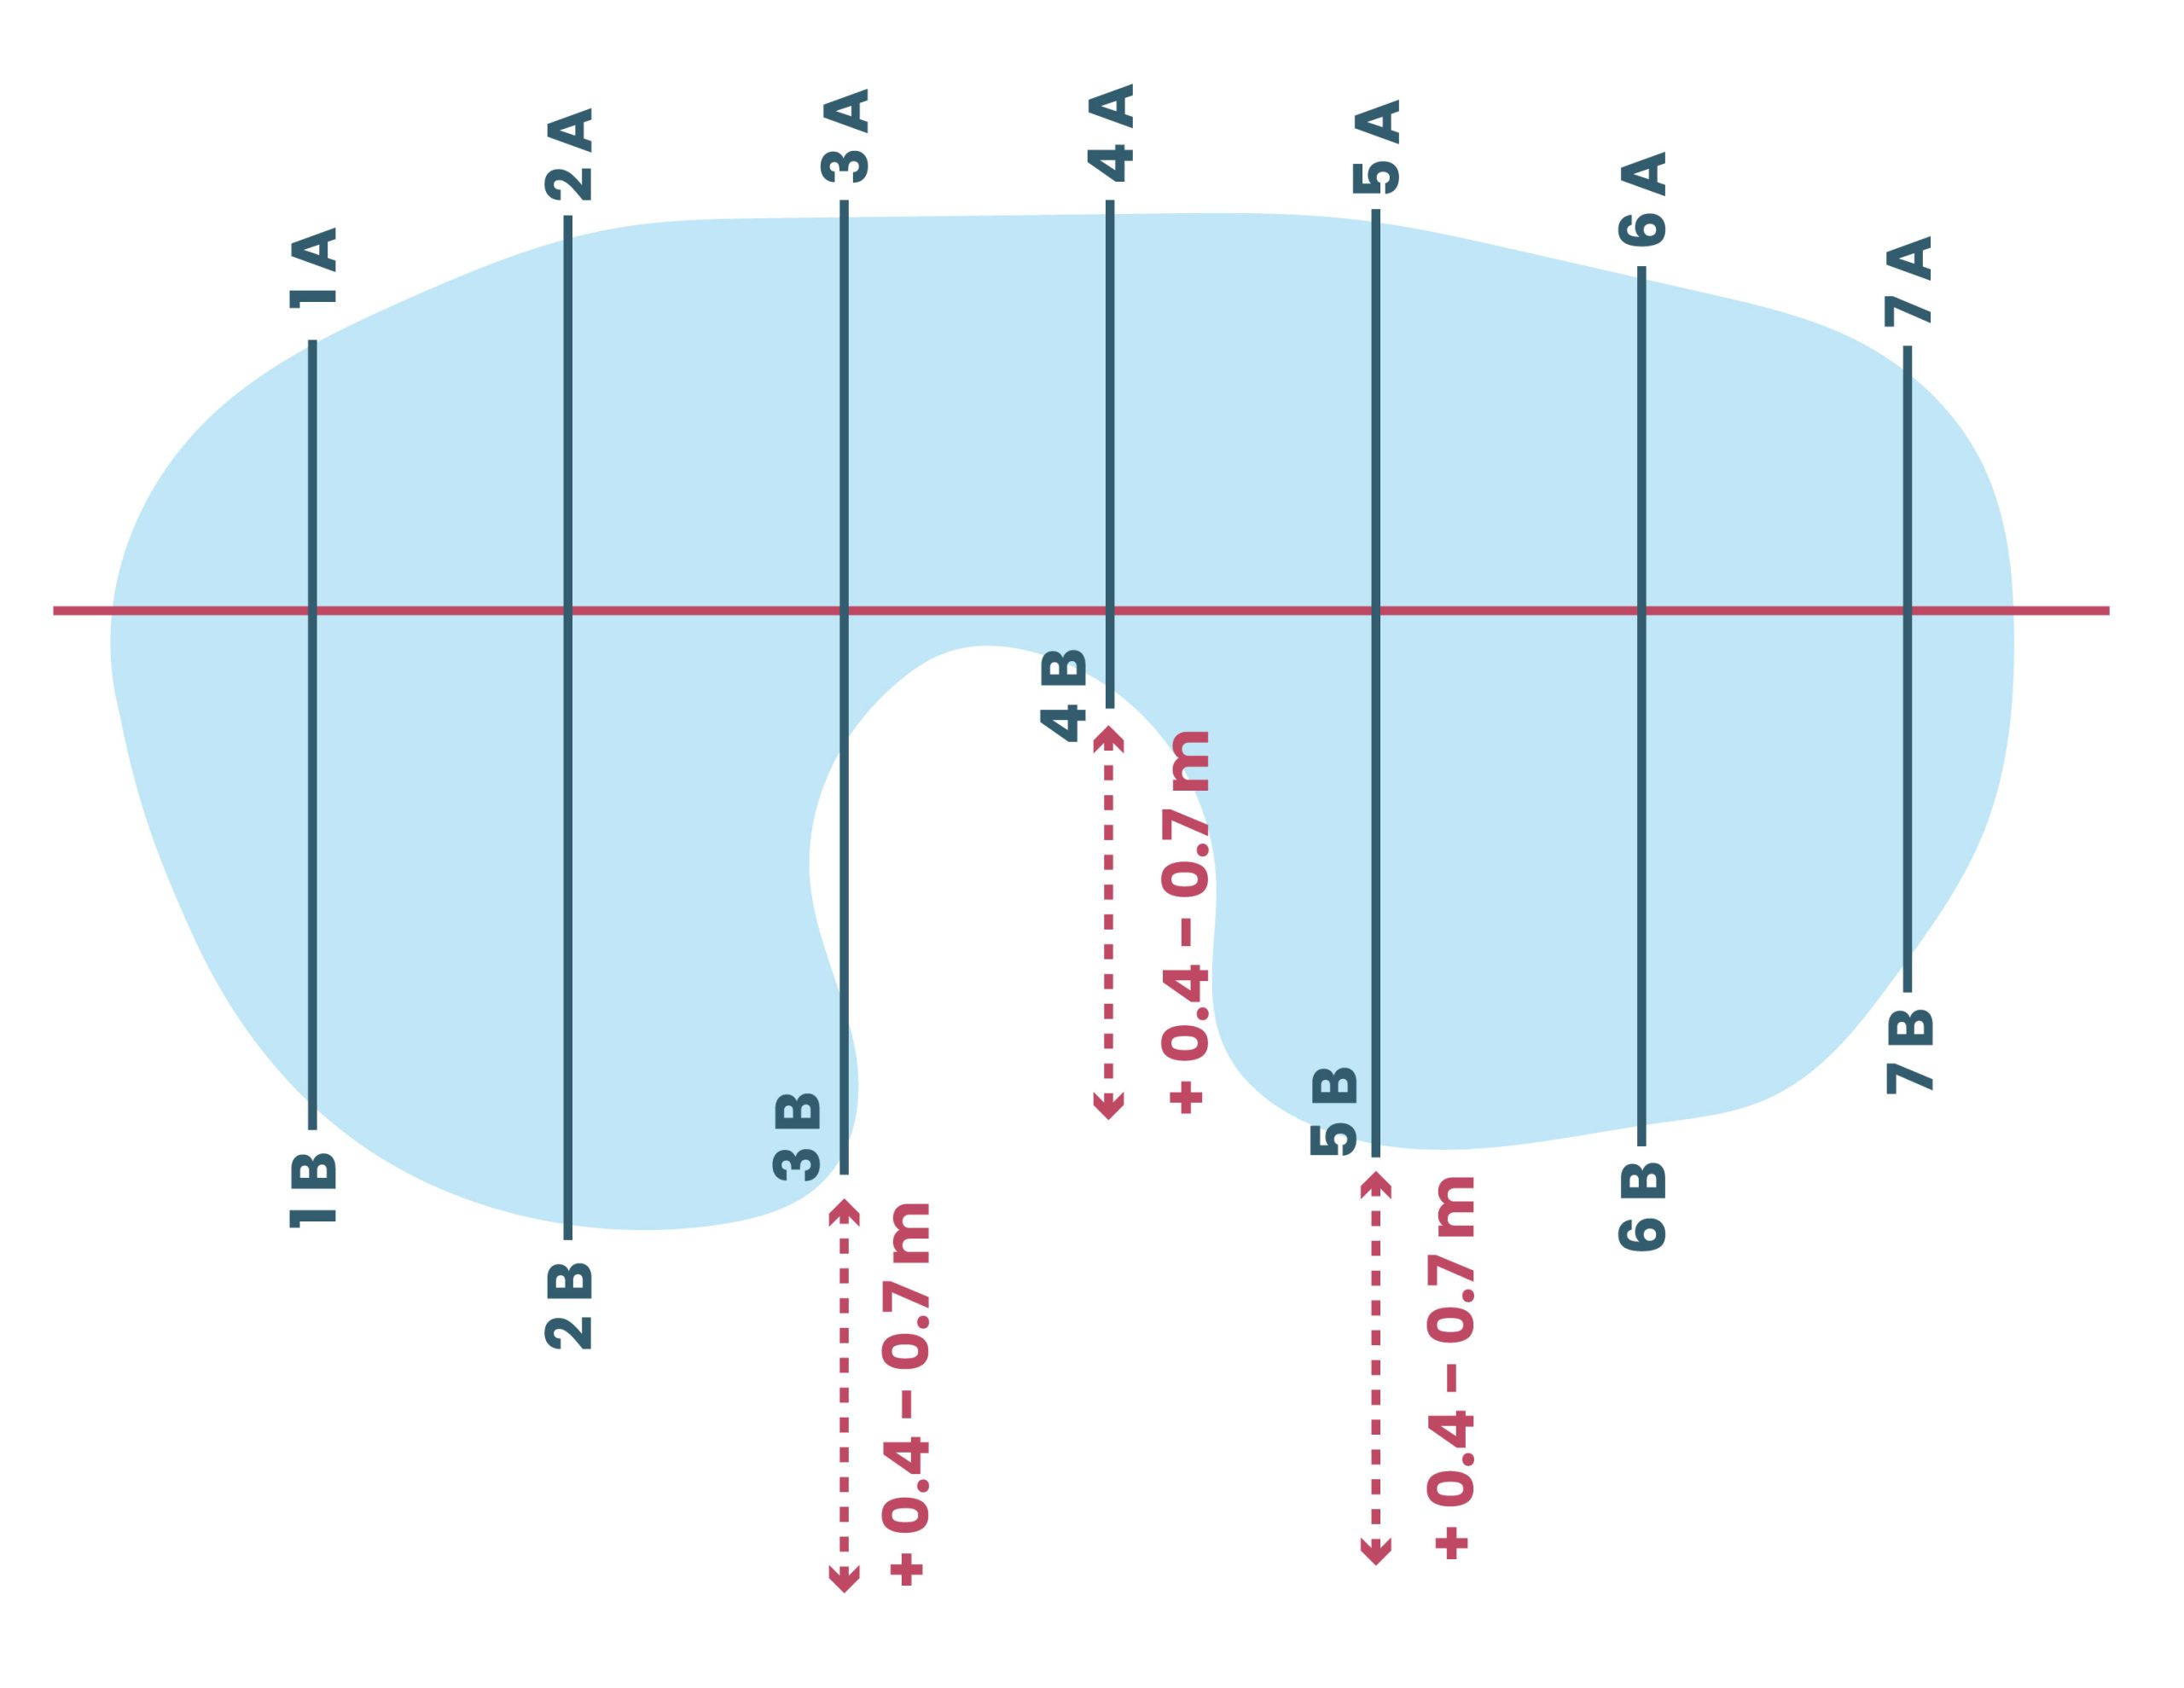
If there is a peninsula or similar protrusion in the basin
In this case, the basin will require some extra material from the direction of the spine line, because the liner must curve up onto the peninsula.
It’s recommended to position the spine line so that the tape curves onto the peninsula while still remaining straight. This way, it covers a longer path, meaning the tape will show a higher value along the spine line.
Additionally, folds will form at the base of the peninsula when placing the liner sheet, so extra material must be provided from above, from the edge of the basin. For a peninsula, add 40–70 cm of extra length to each rib that runs through the peninsula or the protruding section of the basin.
Also, add 40–70 cm to one rib before and one rib after the affected area (neighboring ribs).
If the rib’s measuring tape line ends at a curved shoreline
In this case, the less of a right angle the measuring tape forms with the shoreline, the more liner material will be needed for securing.
Additionally, there is some measurement inaccuracy in the direction of the rib: on such curved sections, the tape can show very different values depending on whether the person reading it shifts slightly to the right or left.
Because of this, for curved shorelines, depending on the curvature and the securing method, add 0.5 to 1.2 meters of extra length to the affected ribs.
To help estimate the amount of extra material needed, always include the securing allowance in the rib length during measurement. It also helps to test how much the tape measurement changes when placed in slightly different positions.
Planning with more material is always safer than risking a shortage during installation just to save a few square meters.
Here is the translation without any formatting:
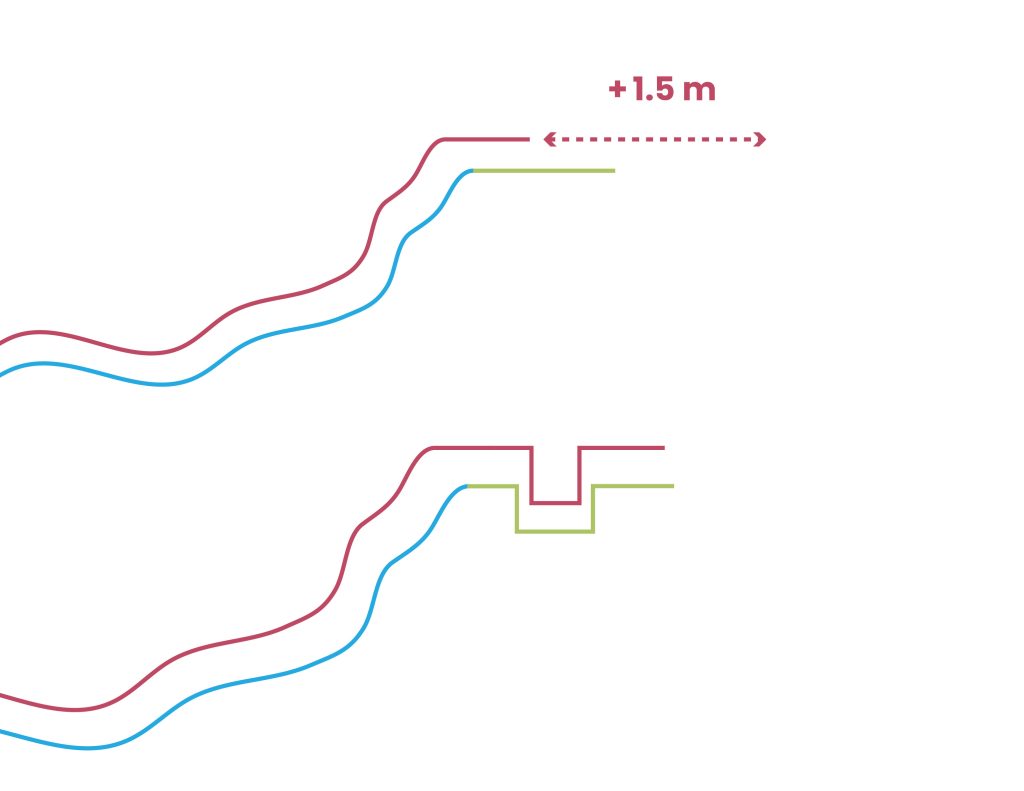
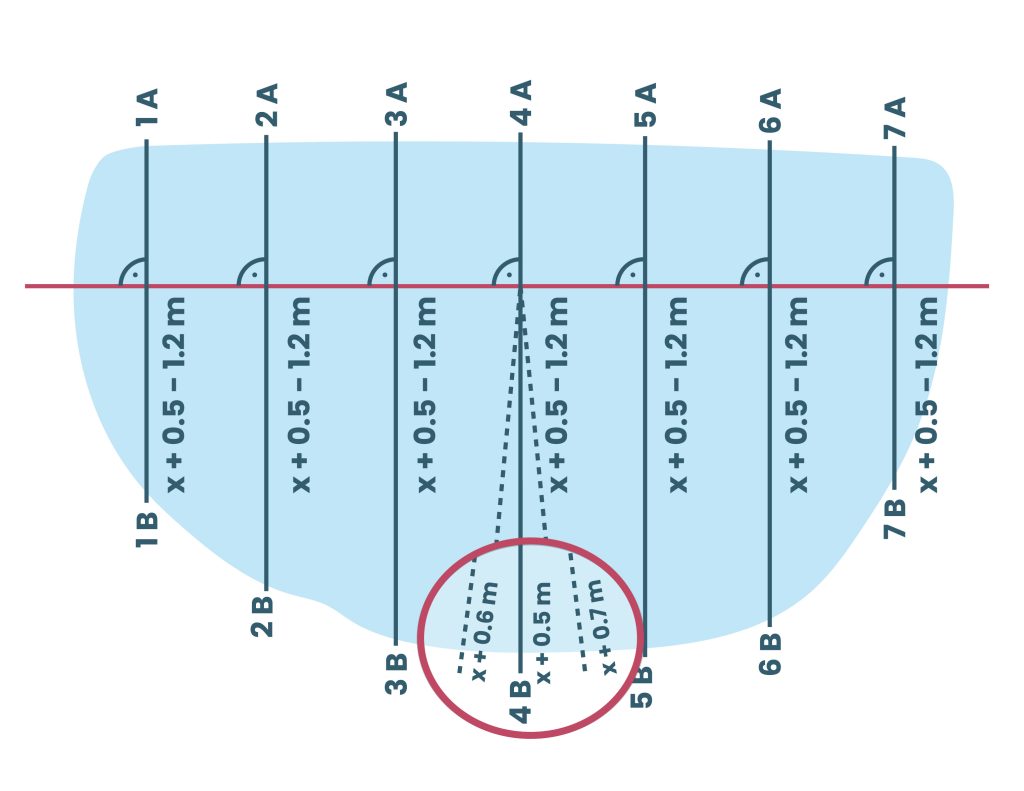
If the length of two consecutive ribs differs significantly, add a small extra length to the shorter rib: if the difference is over 1 meter, add 0.3 meters; if over 1.5 meters, add 0.5 meters; if over 2 meters, add 0.8 meters.
In case of significant difference, the discrepancy should only be considered on either side A or side B relative to the spine line. Do not add the measurements of sides A and B together.
If the shape of the riverbed is very angular or its deepening is more like steps, increase the length of each rib by 30 to 50 centimeters.
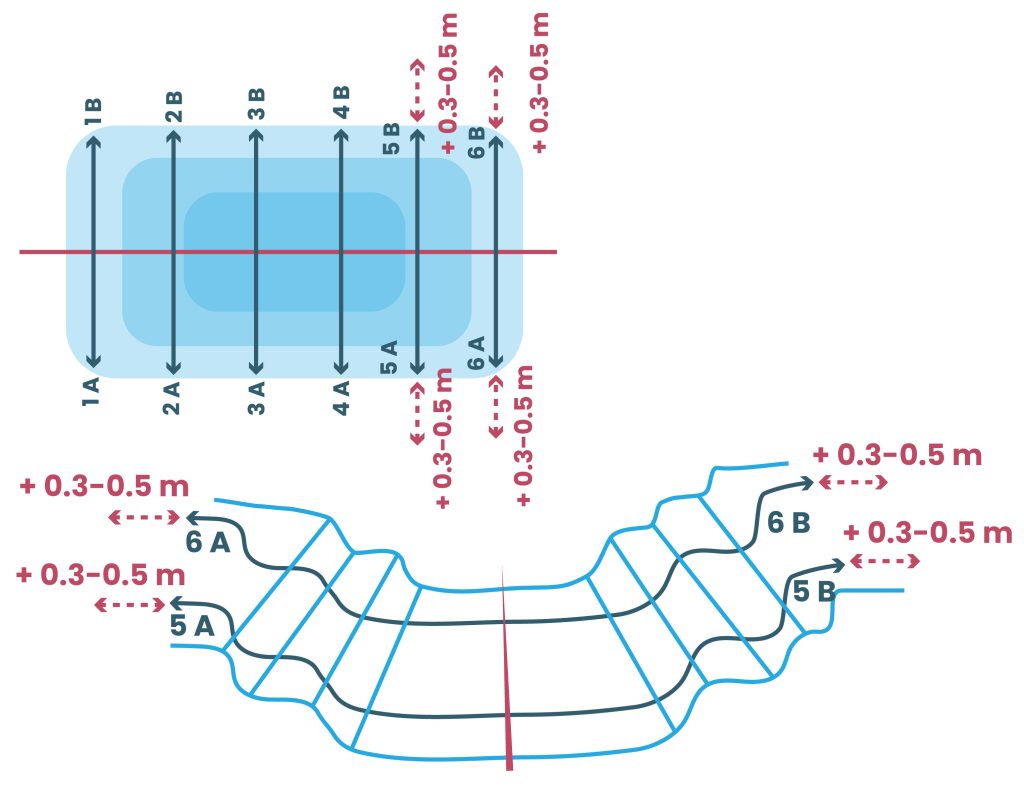
If measurements can only be taken on one side of the spine line, only that side should be considered. #
You should only apply the instructions described here if the shape of the lake “bends” and measurements can only be taken on one side of the spine line. In such cases, the required measurement may start farther from the spine line.
If this does not apply to your riverbed, scroll straight to the bottom of the page to view our guidelines for planning and installation.
In this case, the steps are as follows:
You can only measure the rib in one direction from the spine line.
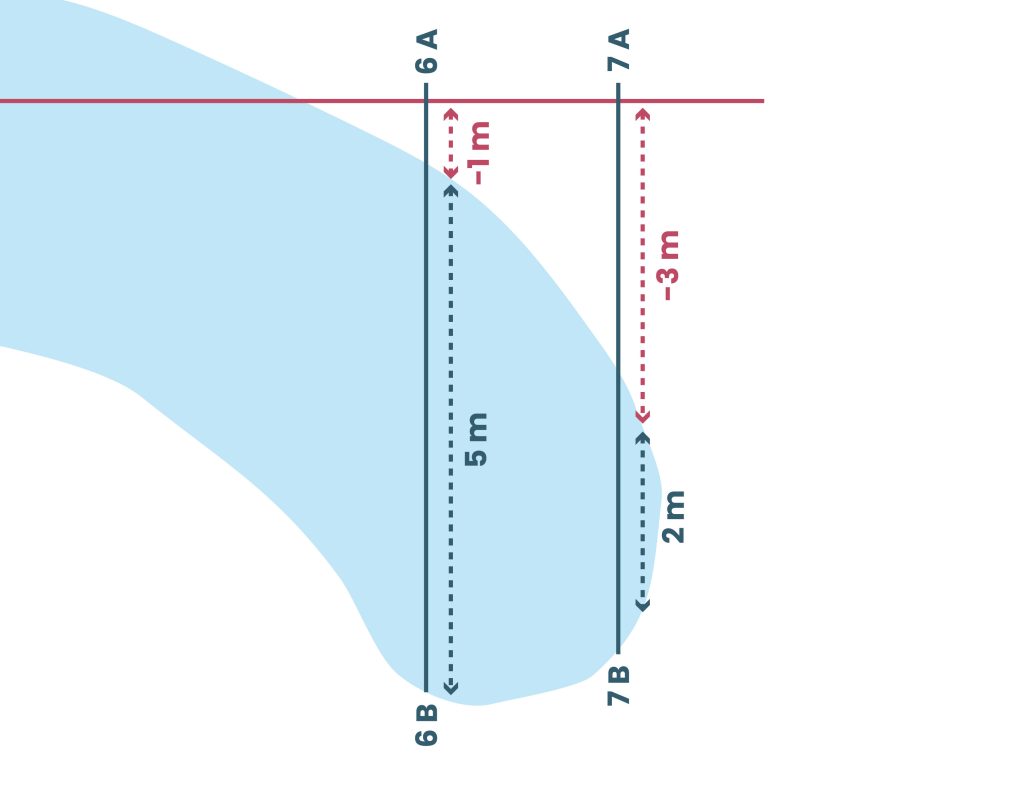
Lay the measuring tape along the rib as usual, then measure the distance between the spine line and the edge of the lakebed that is closer to the spine.
Record this distance on the drawing with a negative sign on the empty side of the spine line (where no ribs need to be measured because there is no lakebed on that side).
The negative value will indicate how far this measurement needs to be shifted relative to the spine.
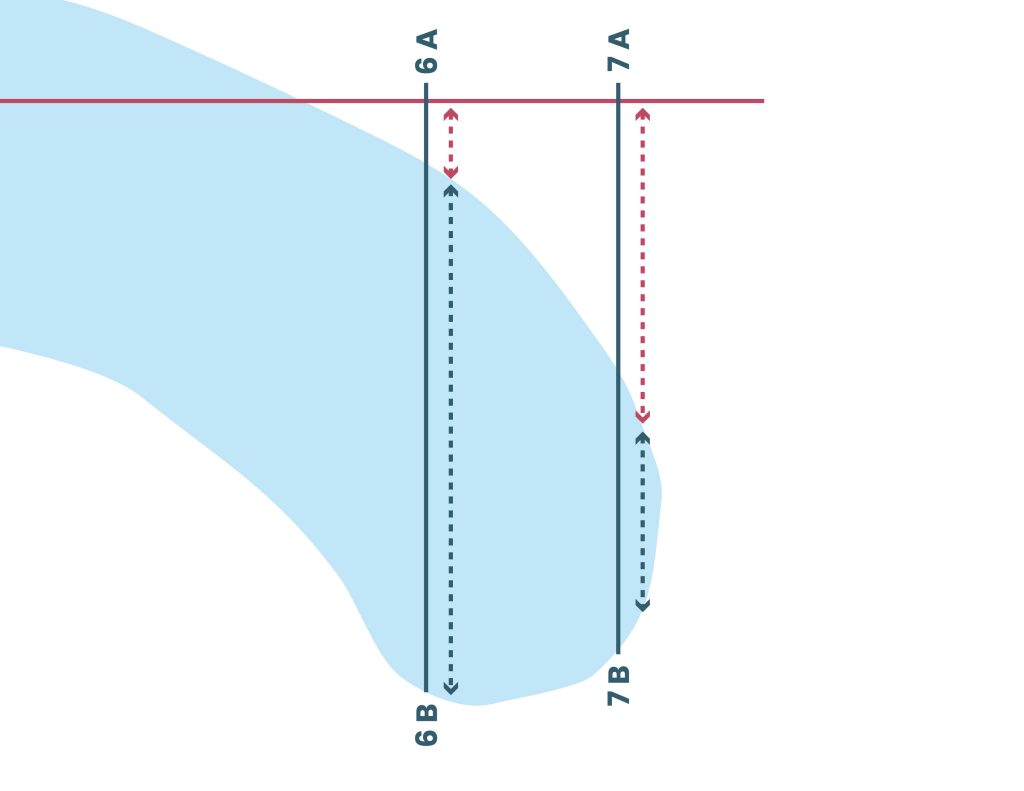
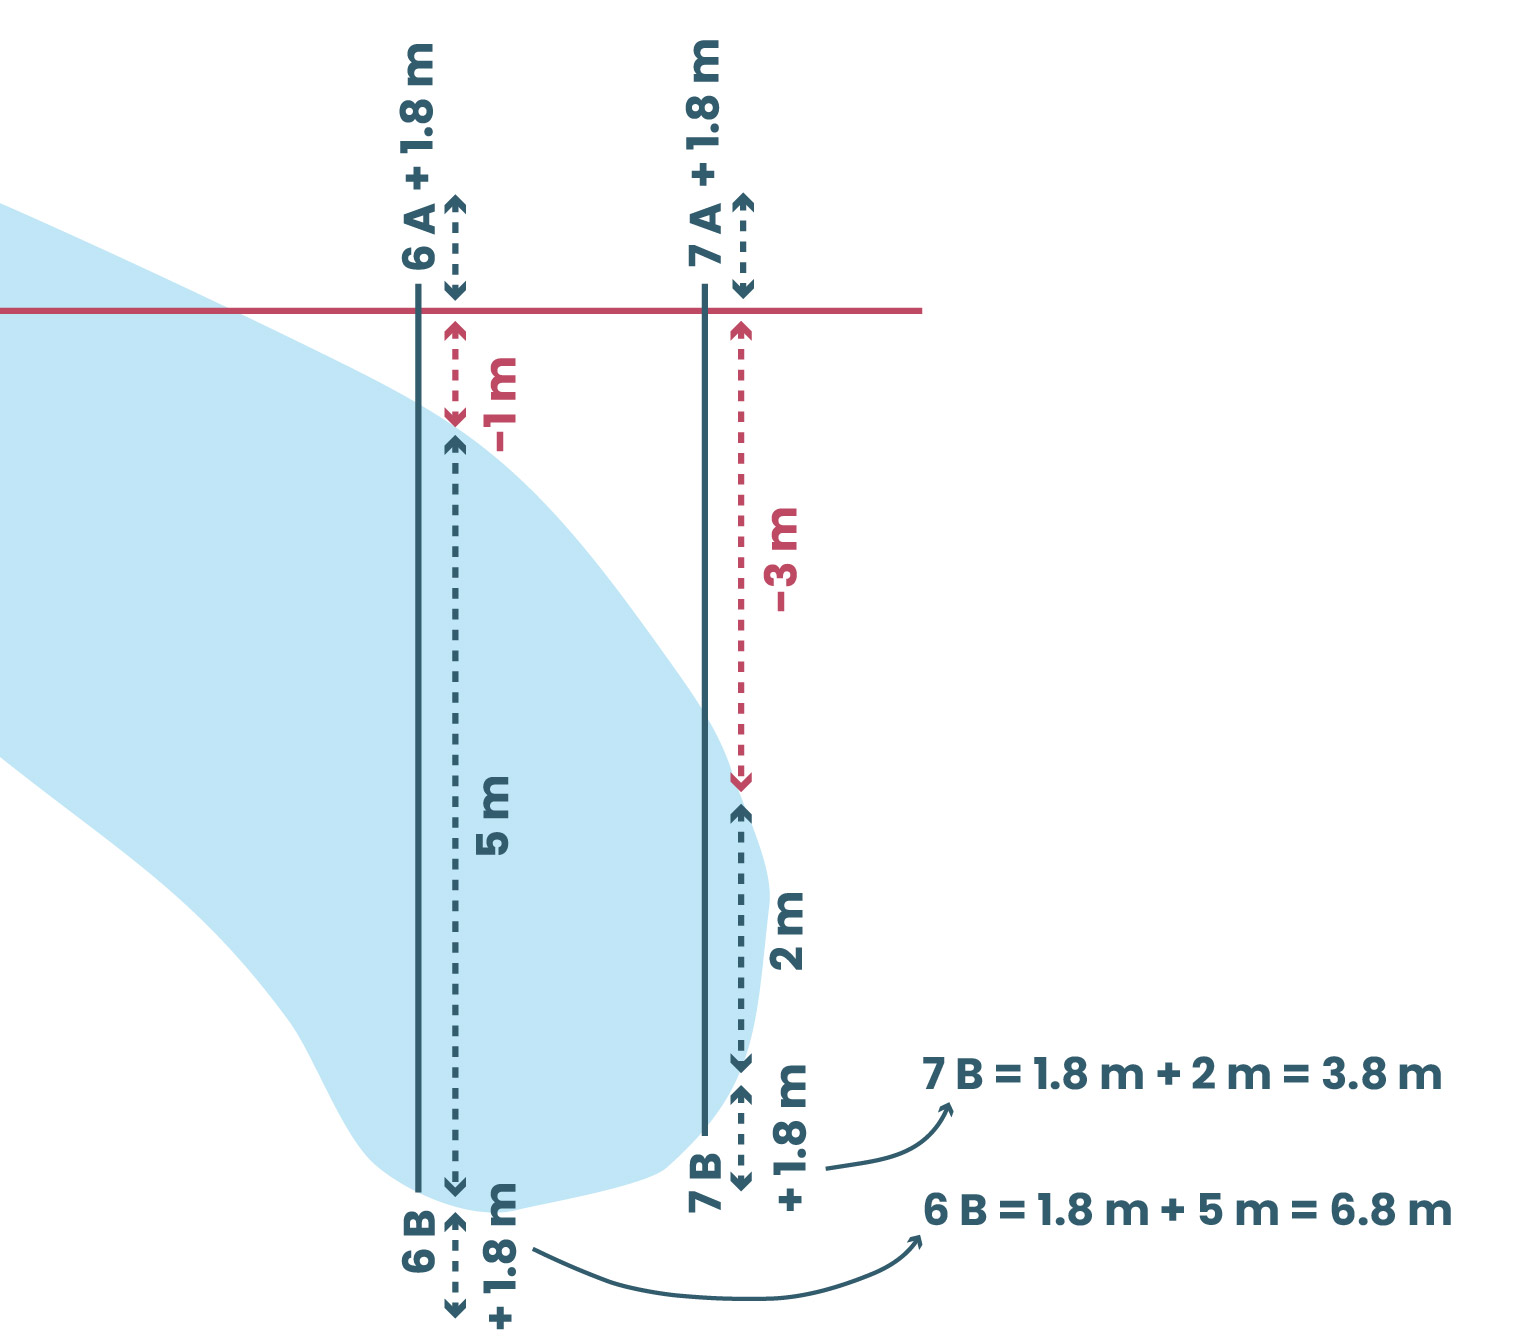
2. Measure the distance between the two edges of the lake — this will be the length of the rib.
3. Add the extra length for fastening and other material allowances to the end of the rib that is farther from the spine line, either for securing or due to the shape of the lakebed.
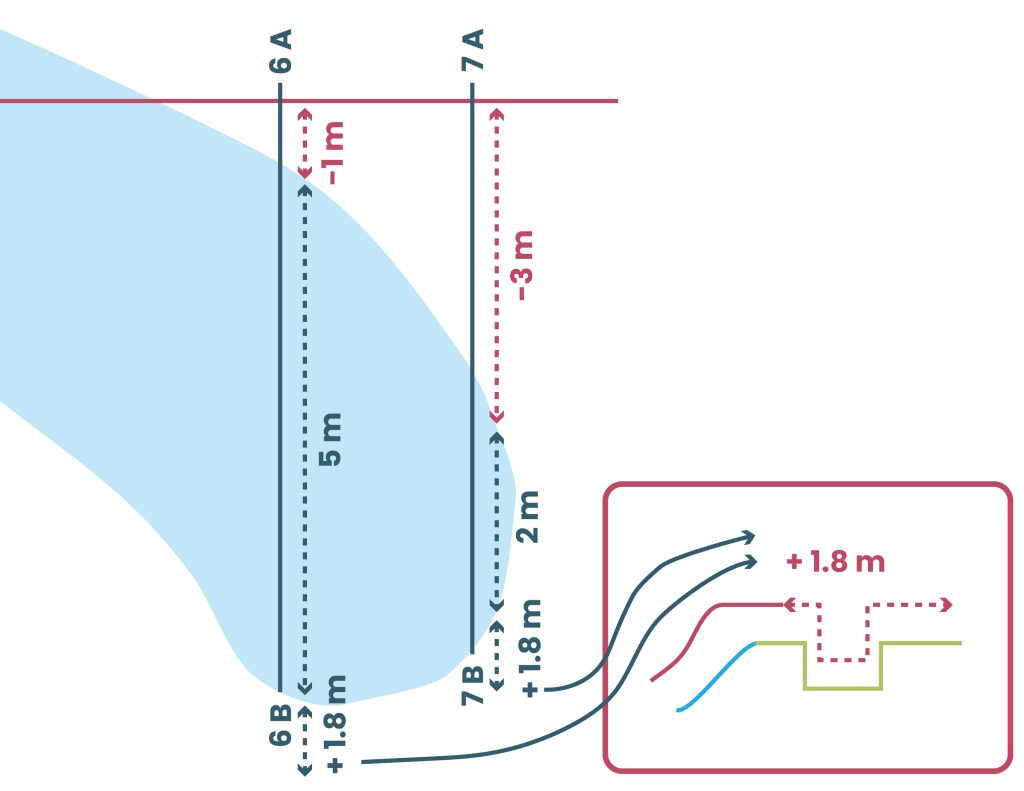
4. Add the necessary extra material allowance to the beginning of the rib that is closer to the spine line, in a way that increases the rib length toward the spine, either for fastening or due to the shape of the lakebed.
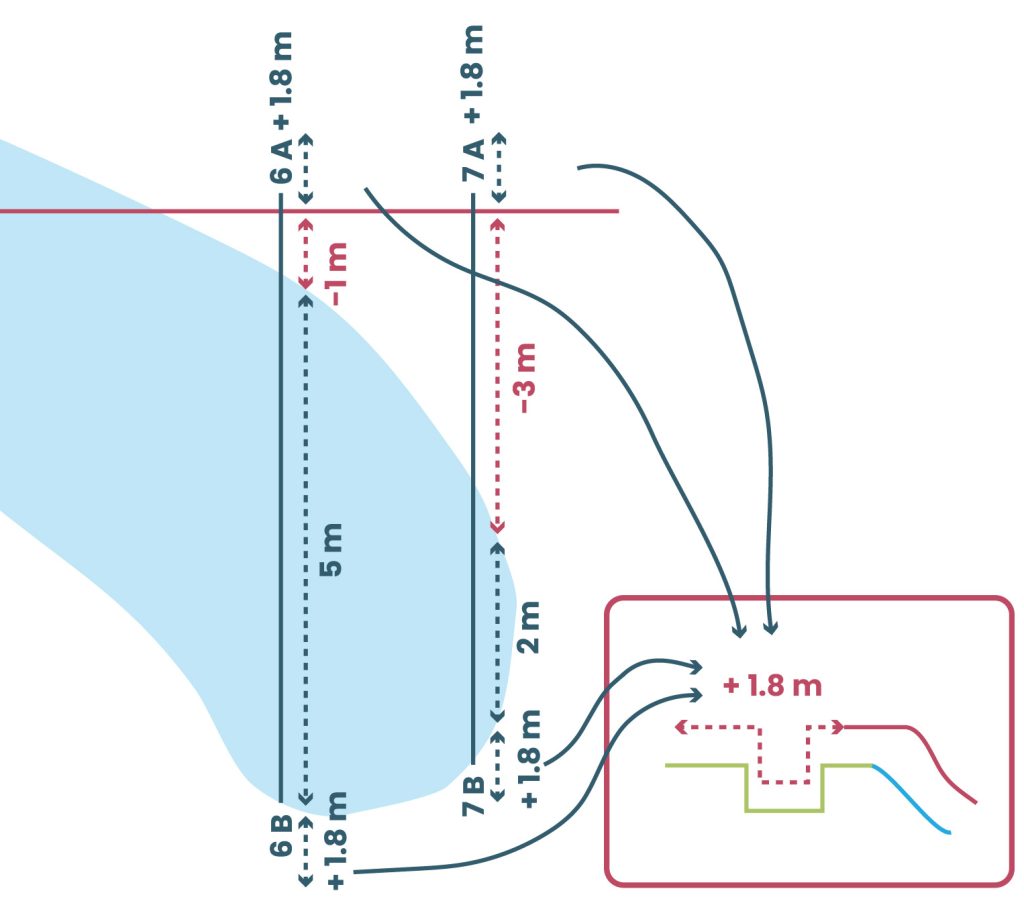
Important:
Adding the extra length will result in a change to the negative value.
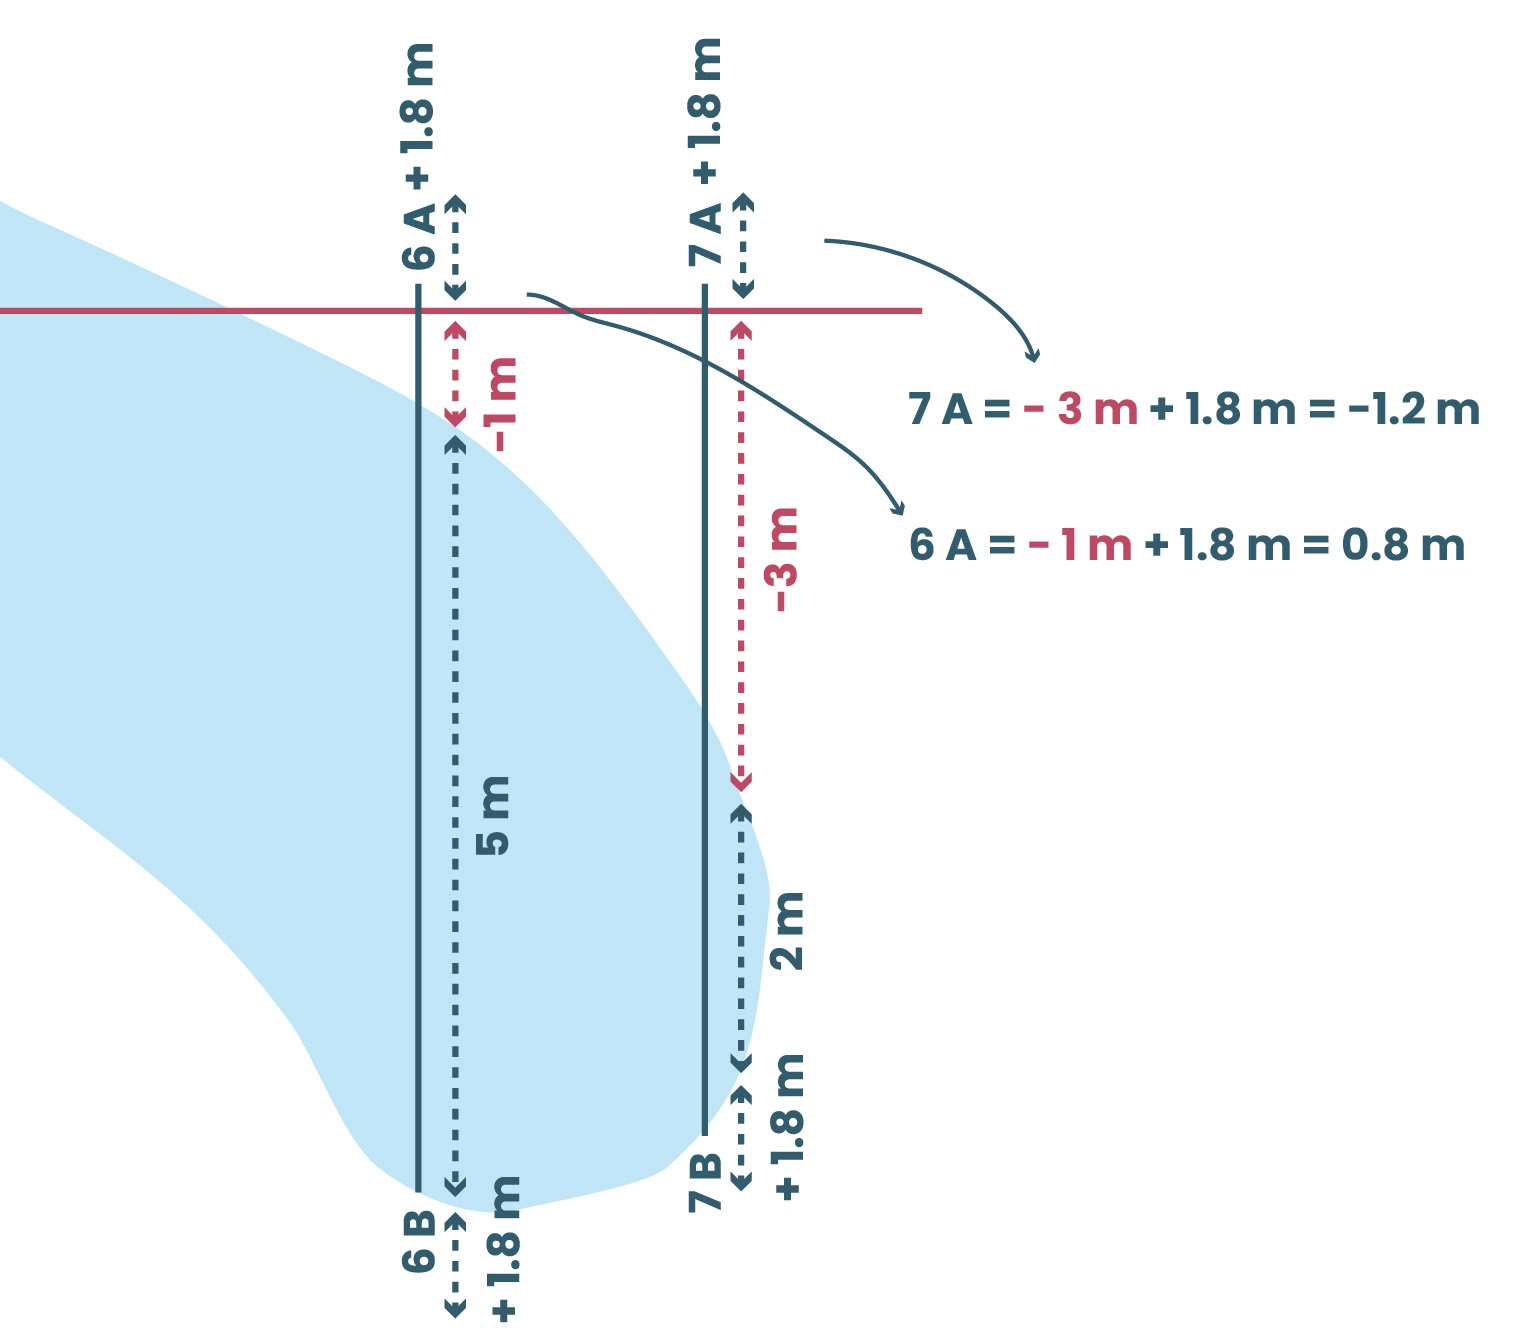
For example, if the negative value was -3.0 meters and you add 1.8 meters of extra material, the negative value changes to -1.2 meters.
This means the rib moves closer to the spine line.
It may also happen that so much extra material needs to be added to the rib that the negative value becomes positive.
In this case, a positive number will appear on both sides of the spine line.
For example, if the value is -3.0 meters and you need to add 1.8 + 2.4 meters (where 1.8 meters is for fastening and 2.4 meters is due to the shape of the lakebed), then the rib will be -3 + 1.8 + 2.4 = 1.2 meters in one direction.
If a positive number appears on the other side of the rib due to the negative value turning positive, then no additional material needs to be added to that side.

Tip:
The spine line is always straight, while the shape of the lake may “bend” away from it. If the difference between the two is large, try marking the spine line along a different path. In that case, start the measurements from the beginning.
Congratulations — if you’ve made it this far, you’re past the hardest part!
From this point on, you’ll only need the recorded values and the pond liner designer at lotusgarden.eu to have your liner layout ready in just a few minutes!